
Air bubbles in hydraulic brake lines are invisible and dangerous. Unlike brake fluid — which is incompressible and transmits 100% of your lever force to the caliper pistons — air compresses. That means a spongy lever feel at best, and complete brake failure at worst: the lever pulls all the way to the bar with zero stopping power. Learning to properly motorcycle bleed brakes takes about 20–30 minutes per caliper, costs under $20 in fluid, and is one of the most impactful maintenance tasks you can do yourself.
You need to bleed brakes after any brake line work, after removing a caliper during pad replacement, as part of a regular brake fluid change (recommended every 2 years by Honda, Yamaha, Kawasaki, and Suzuki), or any time the lever feels spongy. This guide covers two full methods — the traditional two-person pump method and the solo vacuum method — plus a mention of reverse bleeding, exact fluid specifications, a DOT rating comparison table, and the specific mistakes that cause persistent sponginess even after bleeding.
Why Motorcycle Brakes Need Bleeding — The 30-Second Science
How Hydraulic Brakes Work
When you squeeze the brake lever, the master cylinder piston pushes incompressible brake fluid through the lines to the caliper pistons, which press the pads against the rotor. The system works because fluid doesn’t compress — it transmits 100% of your input force. Any trapped air compresses instead of transmitting that force, and braking power drops proportionally to the volume of air trapped in the system.
How Air Gets In
Air enters the system through opened banjo bolt fittings during line work, worn caliper piston seals (micro-ingress over time), a master cylinder reservoir that dropped too low (the master cylinder sucks air past the intake port), or caliper removal during pad changes. Even a tiny bubble at the master cylinder end can cause a noticeable change in lever feel.
Why Old Fluid Needs Replacing
Brake fluid is hygroscopic — it absorbs moisture from the atmosphere through rubber lines and reservoir seals at a rate of roughly 2–3% water per year. That absorbed water drastically lowers the boiling point: fresh DOT 4 boils at 230°C (446°F), but fluid with 3.7% water content drops to approximately 155°C (311°F). Under hard braking — track days, loaded touring, mountain descents — hot fluid boils, creating vapor bubbles that compress exactly like air. The result: sudden brake fade or total loss of braking, precisely when you need it most.
Old fluid also corrodes internal components: the master cylinder bore, caliper pistons, and ABS modulator valves. Visual check: fresh DOT 4 is clear or light amber. Dark brown or black fluid is overdue for a change.
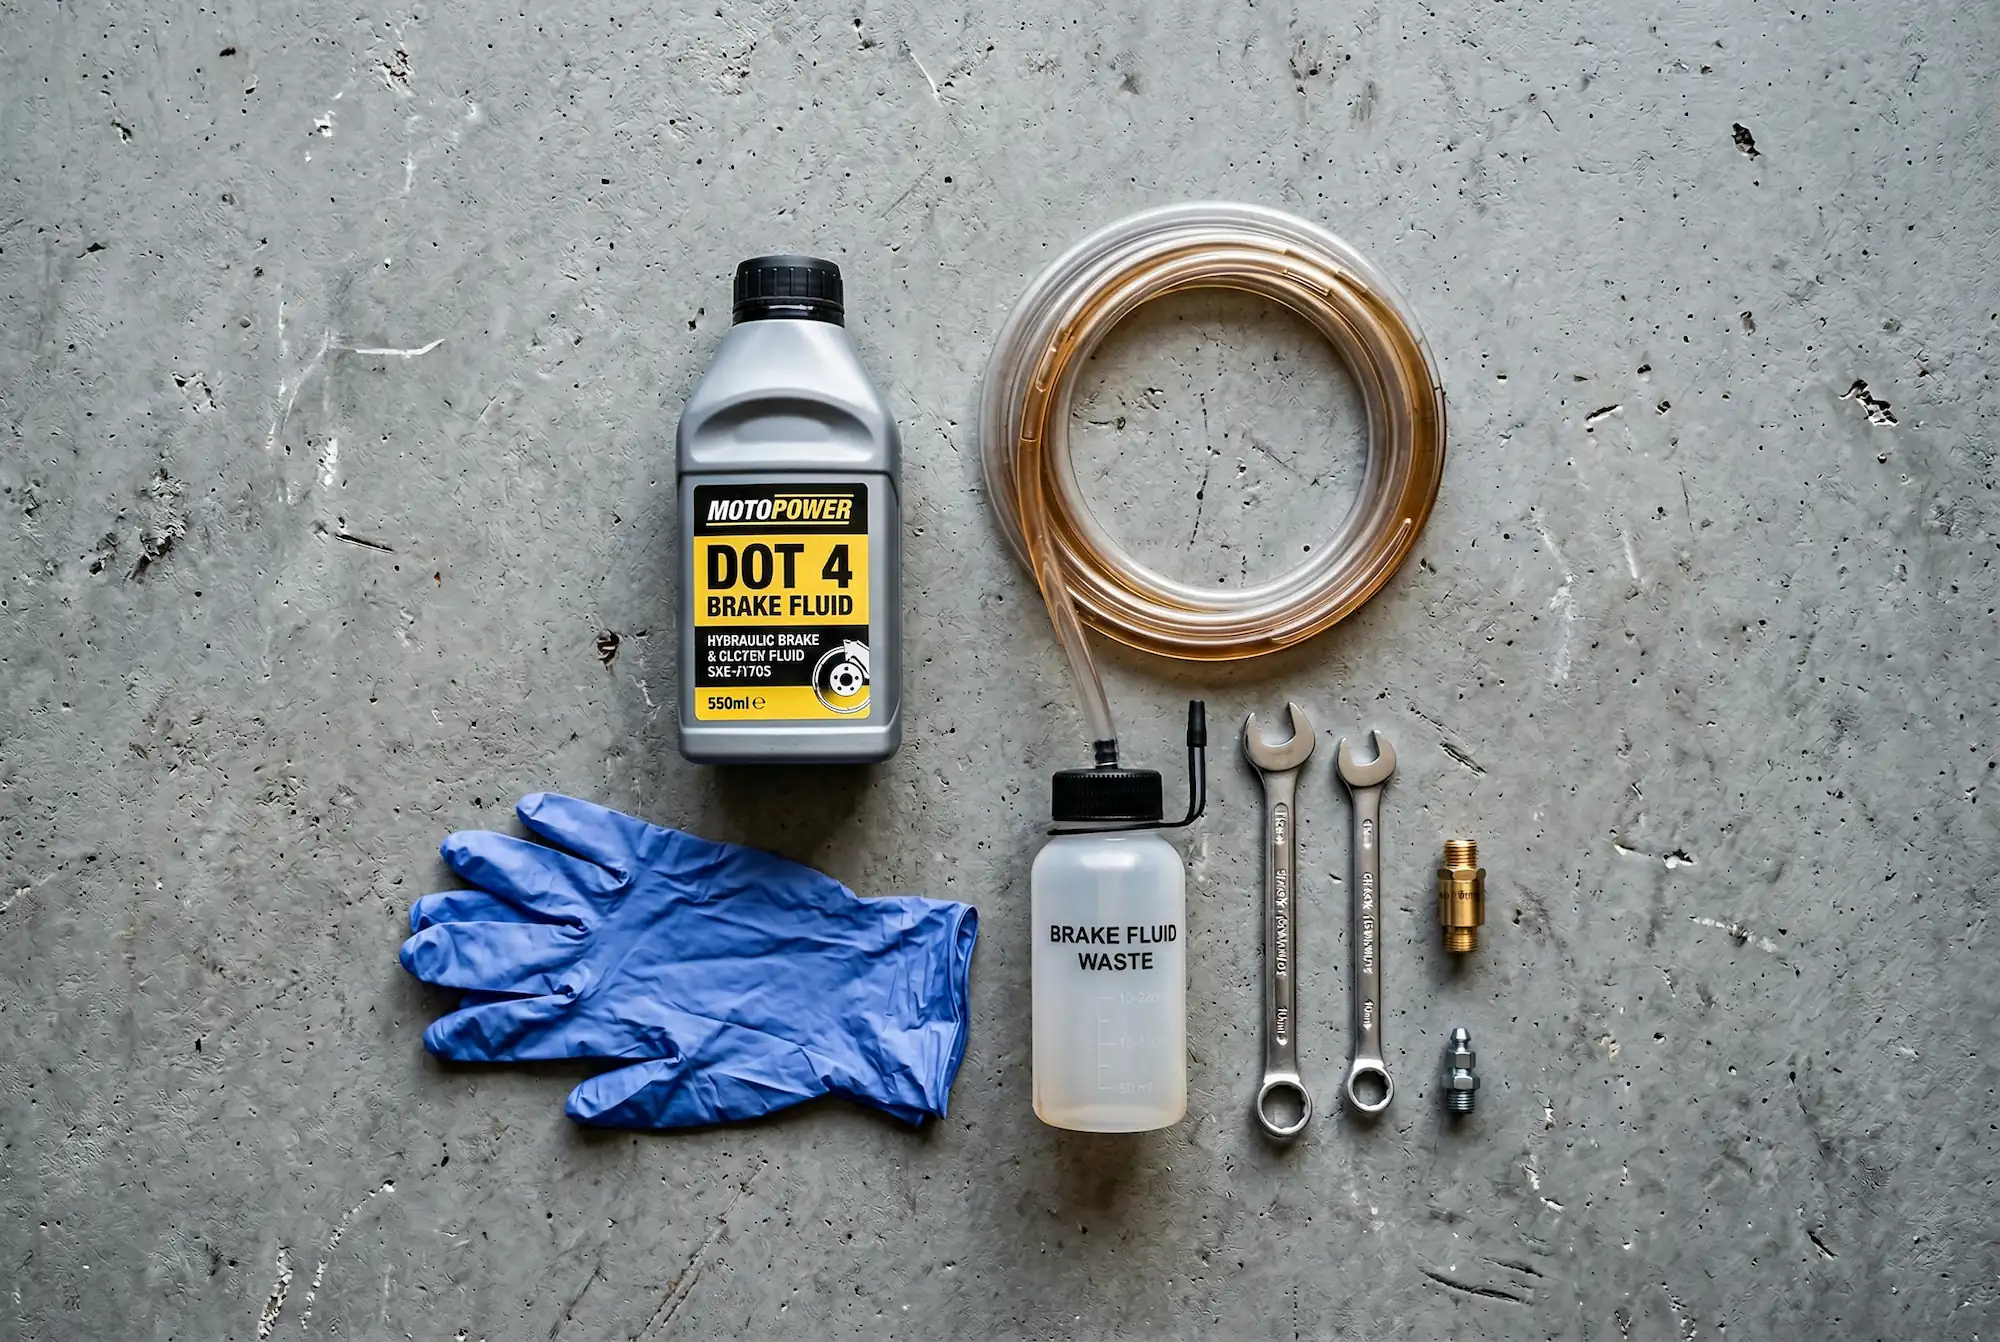
Tools and Supplies for Motorcycle Brake Bleeding
- Brake fluid — DOT 4 for most modern motorcycles. Reliable brands: Motul DOT 4, Castrol React DOT 4, Brembo DOT 4. ~$8–$15 per 500ml bottle. You’ll need ~250–500ml per front system bleed. ⚠️ DOT 5 (silicone-based) is NOT compatible with DOT 3/4/5.1 (glycol-based). DOT 5 is rare — mostly Harley-Davidsons. Mixing = destroyed seals.
- Box-end wrench — 8mm or 10mm (check your bleed nipple size). Use a 6-point box-end or flare-nut wrench only — open-end wrenches round off nipples, and a rounded bleed nipple is a miserable problem.
- Clear vinyl tubing — ~30cm length, ~3mm (1/8″) inner diameter. Fits over the bleed nipple and lets you see bubbles exiting the system. ~$2 at any hardware store.
- Catch container — a small jar or bottle to collect expelled fluid.
- Vacuum pump or syringe (for solo method) — Mityvac MV8000 ($30–$50) or a 60cc catheter-tip syringe ($5). TRO.bike recommends the MVA6913 brake bleed adapter kit paired with 60cc Easy Glide syringes — a solid recommendation we agree with.
- Clean rags + water and soap — ⚠️ DOT 3/4/5.1 brake fluid destroys paint, plastic, and clear coat on contact. One drip on your tank = permanent damage. Have rags draped over every surface near the master cylinder. To neutralize brake fluid spilled on paint, flush immediately with plenty of water — brake fluid (DOT 3/4/5.1) is glycol-ether based and fully water-soluble. A soak with soapy water is the most effective first response. Isopropyl alcohol can clean residue afterward, but water dilutes and neutralizes far more effectively than alcohol alone. Speed is everything — wipe and flush within seconds.
- Turkey baster — for sucking old fluid out of the reservoir before refilling with fresh.
DOT Fluid Comparison Table
| DOT Rating | Dry Boiling Point | Wet Boiling Point (3.7% water) | Base Type | Compatible With | Common Bikes |
|---|---|---|---|---|---|
| DOT 3 | 205°C / 401°F | 140°C / 284°F | Glycol | DOT 3, 4, 5.1 | Older / budget bikes |
| DOT 4 | 230°C / 446°F | 155°C / 311°F | Glycol | DOT 3, 4, 5.1 | Most modern motorcycles |
| DOT 5.1 | 260°C / 500°F | 180°C / 356°F | Glycol | DOT 3, 4, 5.1 | Performance / track bikes |
| DOT 5 | 260°C / 500°F | 180°C / 356°F | Silicone | DOT 5 ONLY | Some Harley-Davidson models |
⚠️ Never mix DOT 5 with DOT 3/4/5.1. Check your master cylinder cap or owner’s manual for the correct specification.

Method 1 — Traditional Lever Pumping (Two-Person Method to Bleed Brakes on Motorcycle)
Step 1: Prepare the Master Cylinder
Bike upright on a paddock stand or held level by a helper. Remove the reservoir cap screws and lid (front brake reservoir is on the handlebar; rear is typically on the frame near the right foot peg). Use a turkey baster to suck out old fluid from the reservoir — don’t let it run completely empty. Refill with fresh DOT 4. ⚠️ While the cap is off, DO NOT touch the brake lever — fluid will shoot out of the reservoir.
Step 1B: Bleed the Master Cylinder First (Radial Pumps Only)
On modern radial master cylinders (Brembo RCS, Nissin radial pumps — standard on most 2020+ sportbikes and many naked/adventure bikes), bleed the master cylinder nipple FIRST before moving to the calipers. Air naturally rises to the highest point in the system, and on radial pumps that highest point is the MC bleed nipple (usually 11mm, located at the top of the master cylinder body). Attach your bleed tube, pump the lever 3–4 times, hold, crack the MC nipple 1/4 turn, close, release. Repeat until fluid flows clean and bubble-free from the MC nipple. Then proceed to the calipers. If your master cylinder does not have a dedicated bleed nipple (most older axial/conventional pumps do not), you can achieve the same result by carefully loosening the banjo bolt at the MC outlet 1/4 turn while holding the lever — but have rags ready, as fluid will seep out around the fitting.
Step 2: Attach the Bleed Tube
Push the clear vinyl tube firmly onto the bleed nipple at the caliper. Run the other end into your catch container with a small amount of fresh fluid in the bottom. That fluid prevents air from being sucked back into the system through the tube.
Step 3: The Pump-Hold-Open-Close Sequence (Critical)
- Person 1: Pump the brake lever 3–4 times slowly, then HOLD the lever firmly pulled in.
- Person 2: With the lever held in, crack open the bleed nipple 1/4 turn. Fluid and air push out through the tube.
- Person 2: Close the nipple BEFORE Person 1 releases the lever.
- Person 1 releases the lever.
⚠️ This sequence is non-negotiable. If the nipple is open when the lever is released, the system sucks air back in through the caliper. This is the #1 reason motorcycle brake bleeding “doesn’t work.” The order is always: pump → hold → open → close → release.
Repeat 8–15 times until you see no bubbles in the clear tube and the lever feels firm under pressure.
Step 4: Top Off the Reservoir Between Cycles
Check the reservoir every 3–4 pump cycles. If the fluid level drops below the intake port inside the reservoir, the master cylinder sucks air and you’re starting over — or worse. Keep the reservoir at least half full at all times during the bleed.
Step 5: Final Check
Close the bleed nipple and torque to 5–8 Nm (approx. 4–6 ft-lbs).
⚠️ Warning: Do not exceed 8 Nm. Bleed nipples are hollow, thin-walled screws — they are far weaker than solid bolts of the same thread size. Applying 12 Nm (a common over-torque) risks stripping the threads in aluminum calipers or snapping the nipple off inside the caliper bore. A broken bleed nipple stuck inside a caliper requires drilling and extraction or complete caliper replacement ($200–$500+). Use a short wrench and snug the nipple until it seats against the taper — then add only a small amount of torque beyond that. If in doubt, use a torque wrench set to 7 Nm.
Remove the tube, wipe everything down, replace the reservoir cap. Pump the lever several times to verify a firm, consistent feel. No sponginess, no travel to the bar.
Method 2 — Solo Vacuum Bleeding (One-Person Method)
This is how to bleed motorcycle brakes when you’re working alone — no helper needed.
Step 1: Prepare the Master Cylinder
Same as Method 1 — remove cap, turkey baster out old fluid, refill with fresh DOT 4.
Step 1B: Bleed the Master Cylinder First (Radial Pumps Only)
Same as Method 1 Step 1B — if your bike has a radial master cylinder with a dedicated bleed nipple, bleed it first before connecting the vacuum bleeder to the caliper. Air trapped at the MC exit will never be pulled down and out through the caliper.
Step 2: Connect the Vacuum Bleeder
Attach the Mityvac (or similar vacuum pump) to the bleed nipple via the adapter hose. Crack the nipple 1/4 turn.
Step 3: Pump the Vacuum
Pump the vacuum handle to pull fluid and trapped air from the caliper through the nipple and into the pump’s collection chamber. Watch the clear hose for bubbles.
Step 4: Watch for Clean, Bubble-Free Fluid
Keep pumping until consistent, bubble-free fluid flows through the tube. Important note: vacuum bleeders can create false bubbles by pulling air past the bleed nipple threads — these appear as tiny, uniformly-sized bubbles that never seem to stop. If this happens, apply a heavy coat of silicone grease (or rubber-safe brake grease) around the base of the nipple where it threads into the caliper body to seal the threads against air ingress. ⚠️ Avoid Teflon tape on brake system fittings — tape can shred during installation or removal, and fragments that enter the hydraulic system can block the tiny return ports in the master cylinder or lodge in ABS modulator solenoid valves, causing expensive failure. Silicone grease is equally effective at sealing threads against false air bubbles during vacuum bleeding and carries zero risk of internal contamination. If bubbles stop, they were false. If they persist, you still have air in the system.
Step 5: Keep the Reservoir Topped Off
Same critical rule — check and refill after every 3–4 pumps. Letting it run dry introduces new air.
Step 6: Close, Tighten, Verify
Close nipple, torque to 5–8 Nm (see Method 1 Step 5 for torque warning), remove equipment, wipe down, replace cap, pump lever to verify.
Alternative: Reverse / Backflush Bleeding
Using a 60cc syringe with an adapter tip, you can push fresh fluid UP through the bleed nipple → through the caliper → up through the lines → into the master cylinder reservoir. Since air naturally rises, pushing from the bottom forces all bubbles up and out through the reservoir.
⚠️ Critical ABS Warning: Avoid reverse bleeding on ABS-equipped motorcycles unless you first perform a complete system flush with fresh fluid AND have access to an ABS diagnostic scan tool. Reverse bleeding pushes fluid from the caliper upward — but brake fluid is always most heavily contaminated at the caliper end of the system (heat cycling, seal wear, and moisture accumulation concentrate debris here). Pushing this contaminated fluid backward forces particles directly into the ABS modulator’s micro-solenoid valves, which have extremely tight tolerances. Even small debris can block a solenoid passage, causing the ABS to malfunction or lock a wheel during activation. A failed ABS modulator typically costs $800–$1,500+ to replace. On ABS bikes, always bleed in the normal flow direction (master cylinder → caliper) or use a dealer-grade diagnostic tool that can cycle the ABS pump and solenoid valves during the bleed process to flush all internal passages.
On non-ABS bikes, reverse bleeding is highly effective and arguably the best solo method. TRO.bike’s Robin Dean argues this is the single best method for solo work, and after covering all three approaches, we tend to agree — for non-ABS systems. The upfront cost is minimal (a 60cc syringe plus an adapter for the bleed nipple), and the physics of air rising naturally works in your favor rather than against you. ⚠️ Important: When reverse bleeding, always use FRESH fluid in the syringe — never push used or old fluid back into the system.

Front vs. Rear Brakes — Key Differences
Front Brake
- Dual-disc systems (two calipers): if your master cylinder has a bleed nipple (radial pumps), bleed the MC first. Then bleed the caliper farthest from the master cylinder first, then the closer one.
- Some sportbike calipers (radial-mount Brembo-style) have two bleed nipples per caliper — bleed both, starting with the one farthest from the line entry.
- Position the handlebar so the reservoir is level. If tilted, air pockets form in the reservoir that won’t evacuate properly.
- Monoblock calipers (single-piece construction with no visible joining bolts — Brembo M4, M50, Stylema, Nissin monoblock): These calipers have complex internal fluid passages that can trap air in bridge channels between cylinder bores. If standard bleeding leaves persistent sponginess in a monoblock caliper, remove the caliper from the fork and rotate it during bleeding so the bleed nipple is at the absolute highest point. Tap the caliper body firmly with a plastic or wooden handle (screwdriver handle, rubber mallet) to dislodge air bubbles trapped in internal passages. Reinstall and re-bleed in the normal position.
Rear Brake
- Usually simpler — single-piston caliper, single bleed nipple.
- Master cylinder is foot-pedal operated, with the reservoir mounted on the frame near the right foot peg.
- Longer line with more bends = more potential air traps. May need more bleed cycles than the front.
- On ABS bikes, the rear ABS modulator is often the hardest component to bleed. Use normal-direction bleeding (not reverse) and consider a dealer diagnostic tool that can activate the ABS pump and solenoid valves to purge trapped air from the modulator’s internal passages.
Common Motorcycle Bleed Brakes Mistakes (And the Spongy Motorcycle Brakes Fix)
This section directly answers the question that appears in every single forum thread about motorcycle brake bleeding:
- Letting the reservoir run dry — the master cylinder sucks air past the intake port. Back to square one, or worse. Check the level obsessively.
- Opening the nipple at the wrong time — the nipple ONLY opens while the lever is held in. Sequence: pump → hold → open → close → release. Every single time.
- Using old or opened brake fluid — opened bottles absorb moisture from the air. A bottle that’s been open 6+ months on the shelf is compromised. Use fresh, sealed bottles. ~$10 for a fresh bottle is cheap insurance for the fluid keeping you alive.
- Over-tightening the bleed nipple — 5–8 Nm max. Bleed nipples are small, hollow, thin-walled — far weaker than a solid bolt of the same size. At 12 Nm, you risk stripping aluminum caliper threads or snapping the nipple off inside the bore. A broken nipple stuck in a caliper requires drilling/extraction or caliper replacement ($200–$500+). Use a short wrench and snug gently.
- Not wiping fluid spills immediately — DOT 3/4/5.1 eats paint, plastic, and clear coat within minutes. One drip on your tank = permanent damage. Drape rags over every surface. Flush any contact area with water immediately — brake fluid is water-soluble and water dilutes it far more effectively than alcohol. Follow with soapy water to neutralize completely. Isopropyl alcohol is useful for cleaning dried residue but is not as effective as water for immediate spill response.
- Skipping the master cylinder bleed nipple (radial pumps) — on radial master cylinders (Brembo RCS, Nissin radial), air collects at the MC outlet — the highest point in the system. If you only bleed at the calipers, this trapped air never leaves. Bleed the MC nipple first, then move to the calipers.
“I bled 3 times and it’s still spongy” — the deeper causes:
- Air trapped in the ABS modulator — standard bleeding can’t reach it. On ABS bikes, use normal-direction bleeding with a dealer diagnostic tool that cycles the ABS solenoid valves. Do NOT attempt reverse bleeding on ABS systems without a complete fresh-fluid flush first — debris pushed backward into the modulator can destroy the micro-solenoid valves ($800–$1,500+ to replace).
- Worn master cylinder piston seals — the seals can’t hold pressure. Rebuild kit: $15–$30.
- Rubber brake lines expanding under pressure — old rubber lines balloon slightly instead of transmitting all force. Braided stainless steel lines ($30–$80) are a worthwhile upgrade that also sharpens lever feel.
- Worn caliper piston seals — leaking past the seals. Caliper rebuild kit: $15–$40.
- Brake pads contaminated with fluid — can’t grip properly. Replace them.
- Air trapped in monoblock caliper internal passages — monoblock calipers (Brembo M4/M50/Stylema, Nissin) have bridge passages between cylinder bores that can trap persistent air bubbles. Remove the caliper, rotate it with the bleed nipple at the highest point, tap the body to dislodge bubbles, and re-bleed.
A Note on Caliper Piston Cleaning Before Pad Changes
⚠️ Critical: If you’re bleeding brakes during a pad change and need to push the caliper pistons back into their bores, STOP and clean the exposed piston surfaces first. Use brake cleaner spray and a clean lint-free cloth to remove all road grime, brake dust, and corrosion from the piston face and the visible portion of the piston barrel. Inspect the dust seal (rubber boot around each piston) for tears or cracking. Pushing a dirty piston back into the bore drags abrasive particles past the caliper seals, scoring both the piston surface and the seal seat. This is the #1 cause of seized caliper pistons after DIY pad replacement — the caliper works fine for a few weeks, then a piston sticks, causing uneven pad wear, dragging brakes, and overheating. Apply a thin coat of red rubber grease (or silicone brake grease) to the cleaned piston barrel before compressing it back into the bore.
How Often — Motorcycle Brake Fluid Change Schedule
- Full fluid change: every 2 years regardless of mileage. Honda, Yamaha, Kawasaki, and Suzuki all specify 2-year intervals in their service manuals.
- Bleed (not full change) when: lever feels spongy, after any line work, after pad changes where the caliper was removed, after a crash.
- Track riders: change fluid annually or before each track day season. Some racers change before every track day.
- Quick test: brake fluid moisture test strips (~$8–$12 for a pack) give a definitive reading. Above 3% moisture content = time to change.
Frequently Asked Questions
Can I bleed motorcycle brakes by myself?
Yes — a vacuum bleeder (Mityvac MV8000, $30–$50) or reverse bleeding with a 60cc syringe ($5) both work solo. (Note: reverse bleeding is only recommended for non-ABS systems — see the ABS warning in the reverse bleeding section above.) The traditional pump method ideally needs two people, though some riders zip-tie the lever held in while they crack the nipple from below — it works, but a vacuum pump is easier and more reliable.
What brake fluid should I use?
The vast majority of modern motorcycles specify DOT 4. DOT 5.1 is a compatible upgrade with a higher boiling point — good for performance riding or track use. DOT 5 (silicone) is rare and NOT compatible with DOT 3/4/5.1. When in doubt, DOT 4 from Motul, Castrol, or Brembo.
Why is my brake lever still spongy after bleeding?
Trapped air (especially in ABS modulators — use normal-direction bleeding with a dealer diagnostic tool, not reverse bleeding), worn master cylinder seals (rebuild kit $15–$30), expanding rubber brake lines (upgrade to braided stainless $30–$80), air trapped in monoblock caliper internal passages (remove and rotate caliper during bleeding), or worn caliper piston seals. If you’ve bled 3+ times and the lever is still soft, it’s time to inspect the master cylinder and calipers for wear.
Can I mix DOT 3 and DOT 4?
Yes — DOT 3, 4, and 5.1 are all glycol-based and chemically compatible. They will not damage each other or the system’s seals. However, mixing is not recommended long-term because the boiling point of the blended fluid defaults to the lower-rated fluid. If you add DOT 3 to a DOT 4 system, you lose DOT 4’s high-temperature performance advantage — the mixture’s boiling point drops toward DOT 3 levels. For occasional top-offs in an emergency, it’s fine. For best results, perform a complete fluid flush when switching between grades to maintain full thermal protection. DOT 5 (silicone) is the one you absolutely cannot mix with the others.
How do I know when brake fluid needs changing?
Three checks: Visual — fresh DOT 4 is clear/amber; dark brown = change it. Time — every 2 years regardless. Performance — any loss of lever firmness. For a definitive reading, moisture test strips ($8–$12) measure the exact water content.
Wrapping Up
Knowing how to motorcycle bleed brakes is not optional knowledge — it directly determines your ability to stop. Thirty minutes plus $15 in fluid could be the difference between a controlled stop and a lever that pulls uselessly to the bar. Whether you use the two-person pump method or go solo with a vacuum pump, the process is straightforward once you’ve done it once. Don’t put it off.
If you’re doing a full motorcycle brake fluid change rather than just a bleed, the process is the same — you simply keep cycling fresh fluid through until what comes out of the bleed nipple is clean, clear, and bubble-free rather than the dark brown contaminated fluid you started with. Budget about double the fluid (500ml per system) for a full change versus a simple bleed.