
Learning to clean and oil a motorcycle chain is the single easiest maintenance task with the biggest payoff for chain lifespan and your wallet. A clean, well-lubricated chain can last 20,000–40,000 km; a neglected one may not survive past 10,000 km. That’s the difference between one chain replacement or three over the life of the bike — and at $100–$250 for a quality chain-and-sprocket set, the math is obvious. The whole process takes about 15 minutes with basic supplies costing under $25.
But here’s the critical detail most riders learn the hard way: using the wrong cleaner or technique can damage your chain’s O-ring seals, accelerating wear instead of preventing it. This guide covers the step-by-step process for cleaning and lubing, which products are safe (and which aren’t), the WD-40 debate settled once and for all, and a clear motorcycle chain maintenance schedule.
O-Ring/X-Ring vs. Non-Sealed Chains — Why It Matters for Cleaning
This distinction is critical and most guides skip it entirely. The type of chain on your bike determines which cleaners and techniques are safe to use.
Sealed Chains (O-Ring, X-Ring, Z-Ring)
Found on the vast majority of modern street bikes. Small rubber seals sit between the inner and outer link plates, trapping factory grease inside the rollers. This internal grease does the actual lubricating of the pin and bushing. The motorcycle chain lube you spray on the outside primarily protects against rust and reduces friction between the chain rollers and sprocket teeth — it doesn’t replace the sealed internal grease.
Key implication: you CANNOT use aggressive solvents (gasoline, brake cleaner, harsh degreasers) that attack rubber. If the O-rings degrade, the internal grease escapes, and the chain wears out rapidly — potentially in half the normal lifespan.
Non-Sealed (Standard) Chains
Found on older bikes, small-displacement bikes, and off-road/dirt bikes. No internal seals — the chain relies entirely on external lubrication. You can use more aggressive cleaners on these chains because there are no rubber seals to damage, but they also need more frequent lubing (every 300–500 km vs. 500–1,000 km for sealed chains).
How to Tell Which You Have
Look at the chain from the side. If you can see small rubber O-rings or X-shaped seals between the plates at each pin, it’s a sealed chain. Check your owner’s manual for the chain specification — it will list O-ring, X-ring, or standard. Most chains 520 pitch and above from DID, RK, EK, or Tsubaki sold for street bikes since the 1990s are sealed.
What You Need to Clean a Motorcycle Chain (Tools + Products)
You don’t need a garage full of specialty products — here’s what works:
- Chain cleaner: Motul Chain Clean (C1), Maxima Chain Cleaner, or kerosene. Kerosene works great and is cheaper (~$4–$6/gallon at gas station pumps; ~$10–$15/gallon for pre-packaged containers at hardware stores like Home Depot, Lowe’s, or Ace Hardware), but takes a bit more scrubbing effort. ⚠️ Do NOT use gasoline, brake cleaner, or standard WD-40 as a chain cleaner on O-ring chains.
- Chain lube: Two types — wet lube (Motul Chain Lube Road C2, PJ1 Blue Label) for all-purpose street use, and wax/tacky lube (Maxima Chain Wax, Bel-Ray Blue Tac) for dry/dusty conditions or minimal fling. Wet lubes last longer but attract more dirt. Wax lubes stay cleaner but need reapplication sooner.
- Chain brush: The Grunge Brush (~$15) cleans 3 sides simultaneously and is the gold standard. A stiff nylon toothbrush works in a pinch. ⚠️ Never use a wire brush — it damages O-rings.
- Clean rags or microfiber towels — 2–3 needed.
- Piece of cardboard — slide behind the chain to catch overspray and prevent cleaner/lube from hitting the tire or rim.
- Rear paddock stand (recommended) — allows the rear wheel to spin freely. Without one, work in sections and roll the bike forward between each.
Motorcycle Chain Cleaner and Lube Comparison Table
| Product | Type | Best For | O-Ring Safe? | Approx. Cost | Notes |
|---|---|---|---|---|---|
| Motul Chain Clean (C1) | Aerosol cleaner | Quick cleaning, dissolves road grime | Yes | ~$11–$13 per can | Fast-evaporating, no residue |
| Maxima Chain Cleaner | Aerosol cleaner | Heavy grime, aggressive cleaning | Yes | ~$10 per can | Effective, widely available |
| Kerosene | Liquid solvent | Budget cleaning, deep soak | Yes (mild on O-rings) | ~$4–$6/gal (pump) / ~$10–$15/gal (packaged) | Requires more scrubbing; leaves thin oily film (compatible with chain lube) |
| Motul Chain Lube Road (C2) | Wet lube (spray) | All-purpose street riding | Yes | ~$12 per can | Good adhesion, moderate fling |
| Maxima Chain Wax | Wax lube (spray) | Dry/dusty conditions, minimal fling | Yes | ~$10 per can | Stays clean, needs more frequent application |
| Bel-Ray Blue Tac | Tacky lube (spray) | All-conditions, low fling | Yes | ~$12 per can | Excellent adhesion, blue color aids visibility |
| PJ1 Blue Label | Wet lube (spray) | All-purpose street riding | Yes | ~$11 (5oz) / ~$15 (13oz) | Forum favorite, good value, won’t fly off |
| 80W-90 Gear Oil | Drip-on oil | Budget, excellent lubrication | Yes | ~$5 per quart | Old-school effective but messy; apply by brush |

How to Clean a Motorcycle Chain — Step by Step
⚠️🔴 CRITICAL SAFETY WARNING — READ BEFORE STARTING: NEVER clean, lube, or work on the chain with the engine running and a gear engaged. This is the #1 cause of finger amputation in motorcycle maintenance — documented in peer-reviewed medical literature (Journal of Orthopaedic Trauma and Reconstruction, 2025). Beginners sometimes put the bike in first gear on the center stand to let the rear wheel spin “hands-free” — if a rag, brush bristle, or finger contacts the chain-sprocket interface, the rotating chain pulls it into the sprocket teeth instantly. Injuries range from crushed fingertips to complete amputation of multiple digits. ALWAYS rotate the rear wheel BY HAND with the engine OFF and transmission in neutral.
Step 1: Warm Up the Chain
Take a 5–10 minute ride to warm the chain. Warm metal expands slightly, and warm lube/grime is softer and easier to remove. Don’t clean a stone-cold chain if you can avoid it.
Step 2: Set Up the Bike
Put the bike on a paddock stand or center stand so the rear wheel spins freely. Turn the engine OFF and leave the transmission in neutral. If you have neither stand, use the sidestand and work in sections, rolling the bike forward to access new areas. Place a piece of cardboard behind the lower chain run (between the engine and rear axle) to catch overspray.
Step 3: Apply Chain Cleaner
Spray the entire chain generously with your motorcycle chain cleaner of choice (or apply kerosene with a brush). Let it soak for 2–3 minutes to soften the grime. Rotate the rear wheel slowly BY HAND to coat the full chain.
Step 4: Scrub with a Chain Brush
Using a Grunge Brush or nylon toothbrush, scrub every link — top, bottom, and both sides. The inside of the chain (the side that contacts the sprocket) collects the most grime. Rotate the wheel slowly BY HAND — engine OFF, transmission in neutral and work your way around the entire chain. Be thorough — dirt left on the chain becomes grinding paste between rollers and sprocket teeth, accelerating wear.
Step 5: Re-Spray and Wipe Clean
Give the chain one final spray of cleaner and wipe it down with a clean rag. Let the chain pass through the rag while slowly spinning the wheel by hand. You want to see clean metal — no more black residue on the rag (or at least very little). Repeat if necessary for heavily soiled chains.
Step 6: Let the Chain Dry
If using an aerosol chain cleaner (Motul C1, Maxima), let the chain air-dry for 2–3 minutes — these solvents evaporate cleanly and quickly. If using kerosene, note that kerosene is a petroleum distillate and does NOT fully evaporate like alcohol or aerosol cleaners. It leaves a thin oily film on the chain. This film is compatible with chain lube — you do not need to remove it. Simply wipe the chain with a clean rag to remove excess kerosene and grime, then wait 3–5 minutes before applying lube. Water-based degreasers, on the other hand, must be rinsed thoroughly and dried completely before lubing, as water under the lube promotes rust.
⚠️ During cleaning — inspect the chain. While you’re up close, check for:
- Kinked links (frozen links) — observe the chain as it passes over the rear sprocket. Any link that does not straighten out naturally after leaving the sprocket is developing a tight spot (caused by dirt packed inside the pin/bushing, a damaged O-ring, or internal corrosion). Do NOT test by pushing side-to-side — lateral play indicates a different problem: worn pins and plates (general chain wear requiring replacement). A few kinked links that won’t free up after cleaning and lubing = the chain is nearing the end of its life.
- Missing or damaged O-rings — visible gaps where O-rings should be, or O-rings that are cracked or swollen.
- Sprocket teeth — hook-shaped or pointed (“shark fin”) teeth mean the sprockets are worn. Always replace chain + sprockets as a set.
- Master link clip (if equipped) — verify the closed end of the spring clip points in the direction of chain rotation (forward travel on the top run). A clip installed backward can vibrate loose at highway speed, causing the master link to separate and the chain to derail — a potentially catastrophic failure.

How to Lube a Motorcycle Chain — Step by Step
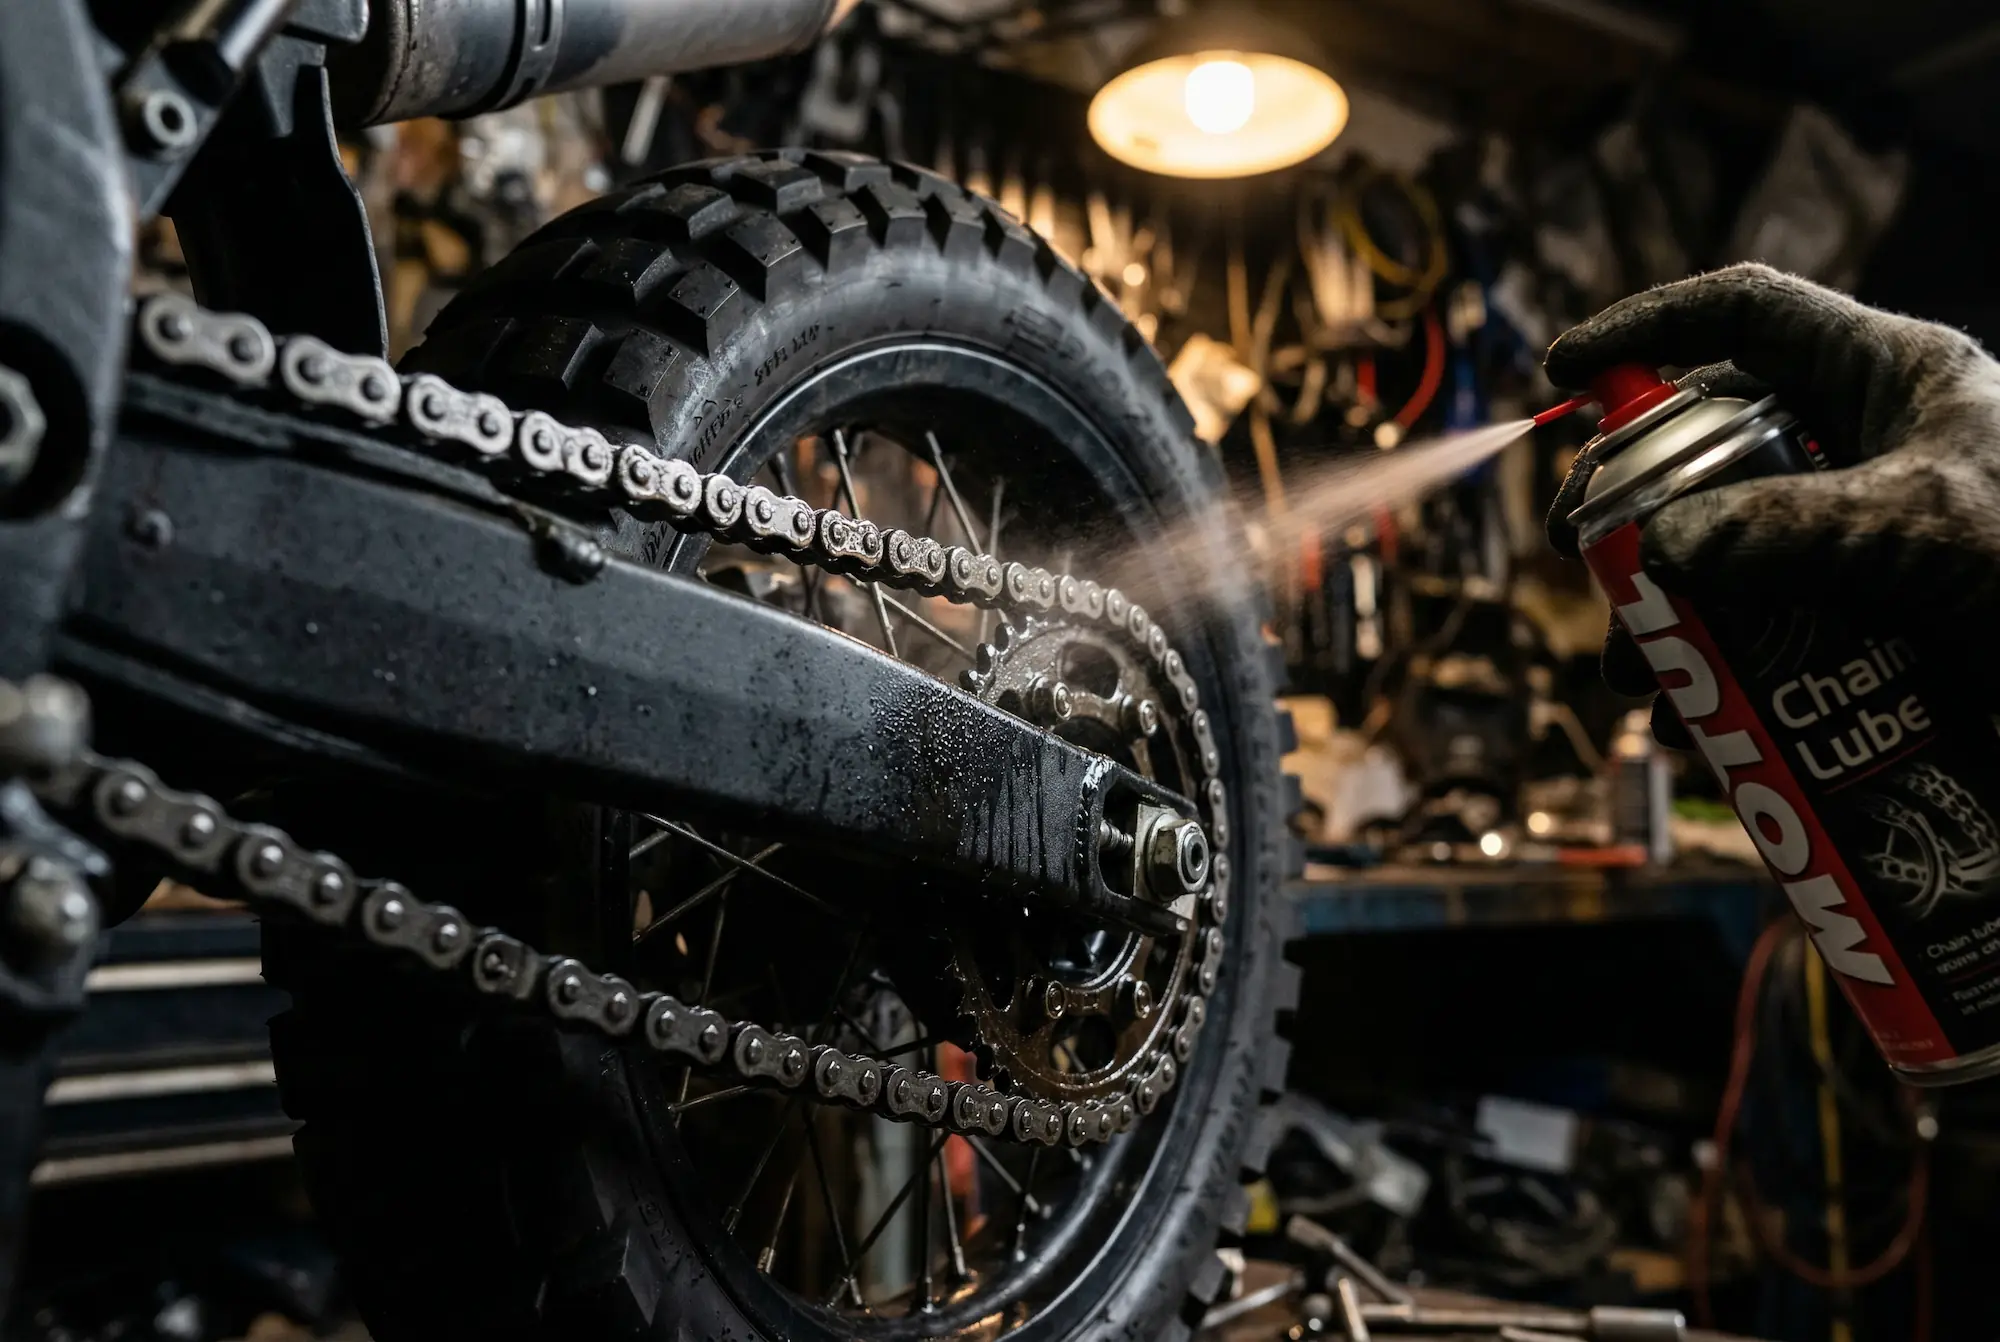
Step 7: Apply Chain Lube to the INSIDE of the Chain
The inside surface (facing the sprocket) is where the lube matters most — this is the contact area between chain rollers and sprocket teeth. Spray in a steady stream while slowly rotating the rear wheel BY HAND (engine OFF). One full rotation of the chain is enough. For drip-on lubes (gear oil), apply one drop per link with a brush.
Step 8: Let the Lube Penetrate for 5–10 Minutes
Don’t ride immediately after lubing. Give the lube time to settle into the rollers and start wicking past the O-ring seals through capillary action. This penetration time is what conditions the O-rings and provides the actual protection.
Step 9: WIPE OFF the Excess — This Step Is Critical
This is the mistake most riders make when learning how to lube motorcycle chain properly: they apply the lube and ride away with a dripping, overloaded chain. Excess lube flings off onto your rear wheel, rim, tire (a safety hazard — lube on the tire reduces grip), and the underside of your bike. Worse: excess lube attracts dirt and grit, which grinds away at the chain — defeating the entire purpose of cleaning it.
Give the wheel one final rotation while lightly gripping the chain with a clean rag from underneath. Focus on wiping the side plates clean and dry — lubricant on the outer side plates serves no useful purpose and only attracts road grit. The goal is to leave the rollers (the cylindrical parts that contact the sprocket teeth) lightly coated and the side plates clean. The chain should look slightly glossy on the rollers but not dripping wet, with no visible buildup on the flat plate surfaces.
The WD-40 Debate — Settled
This is the #1 flame war on every motorcycle forum, so let’s address it directly:
WD-40 is NOT a chain lube. The name literally stands for “Water Displacement, 40th formula.” It’s a light solvent and moisture displacer. It will clean surface grime and displace water, but it evaporates quickly and leaves almost no lasting lubrication.
Will it damage O-rings? WD-40’s own website states their standard product is safe for rubber. The Motorcyclist magazine test by Senior Road Test Editor Ari Henning soaked O-rings in WD-40 and found no significant degradation in short-term exposure. Multiple forum-based O-ring immersion tests show similar results. However, the bigger concern isn’t seal damage — it’s that WD-40 is a penetrating solvent that may wick past O-rings and dilute the sealed factory grease inside the rollers over repeated use.
Bottom line: If you’re stranded and WD-40 is all you have, spray it on as a temporary water displacer and ride to a shop. But don’t use it as your regular motorcycle chain cleaner or lube. Dedicated products exist for a reason, they cost the same, and they do both jobs better. Note: WD-40 does make a separate Specialist Roller Chain Lubricant product that is specifically designed for chains and is O-ring safe — that’s a different product from the standard blue-and-yellow can.
A Note on Automatic Chain Oilers (Scottoiler, TuToro)
If your bike is equipped with an automatic chain oiler (Scottoiler is the most common), your cleaning routine should be less aggressive. These systems continuously dispense a light oil (typically SAE 80/90 gear oil or a proprietary blend) onto the chain while riding. The constant oil supply naturally displaces and centrifuges road grime off the chain during operation. A light wipe-down every 1,000–2,000 km and a visual inspection is typically sufficient — you do not need full solvent-based cleaning sessions as often. Heavy degreasing can actually strip the oil film the oiler is designed to maintain.
How Often Should You Clean and Oil a Motorcycle Chain?
Lubing Schedule
- Every 500–1,000 km (300–600 miles) for sealed chains in normal riding conditions.
- Every 300–500 km for non-sealed chains.
- After every ride in rain or mud — water washes out external lube and promotes rust.
- Before long trips — lube the night before and wipe off excess in the morning.
Full Cleaning Schedule
- Every 1,000–2,000 km (600–1,200 miles) for most riders.
- Every 500–1,000 km if you ride in dusty, muddy, or wet conditions regularly.
- If the chain looks visibly dirty, gunky, or has a buildup of old lube and road grime — it’s time.
A simple rule: You can lube without cleaning (if the chain is relatively clean), but you should never clean without lubing. A degreased chain with no lube = unprotected bare metal = rust starting within hours.
Frequently Asked Questions
Can I use kerosene to clean my motorcycle chain?
Yes — kerosene is an effective and O-ring-safe chain cleaner. It’s cheap (~$4–$6/gallon at gas station pumps, or $10–$15/gallon pre-packaged at hardware stores) and dissolves road grime well. Apply with a brush, scrub, and wipe clean. Note that kerosene leaves a thin oily film — this is normal and compatible with chain lube. Simply wipe off the excess and wait 3–5 minutes before applying lube. It’s messier than aerosol cleaners but performs just as well for heavy buildup.
Should I clean or just lube my chain?
If the chain looks relatively clean (no visible grime buildup), you can skip cleaning and just apply lube. But if there’s visible dirt, old lube residue, or the chain looks dark and gunky, clean first. Lubing over dirt just creates grinding paste that accelerates wear. A good rule: lube every ride or two, full clean once a month or every 1,000–2,000 km.
What’s the best motorcycle chain lube?
For all-purpose street riding, Motul Chain Lube Road (C2), Maxima Chain Wax, and PJ1 Blue Label are consistently top-rated. For dry/dusty conditions, wax-based lubes (Maxima Chain Wax, Bel-Ray Blue Tac) stay cleaner. For budget, 80W-90 gear oil applied with a brush is an old-school method that works surprisingly well — it just requires more frequent application and flings more.
Can I use a pressure washer on my motorcycle chain?
Not recommended. High-pressure water can force its way past O-ring seals, washing out the internal factory grease. If you must use one, keep the nozzle at least 30 cm (12″) from the chain and use a wide, low-pressure setting. A brush plus chain cleaner is always safer.
How do I know when my chain needs replacing?
Three checks: (1) Chain adjusters near the end of swingarm travel = chain stretched beyond adjustment limits. (2) Pull the chain away from the rear sprocket at the 3 o’clock position — if you expose more than half a tooth height, the chain is worn. (3) Kinked links that won’t straighten naturally after passing the sprocket, even after cleaning and lubing. Always replace chain and sprockets as a set — a new chain on worn sprockets wears out faster.
Wrapping Up
Cleaning and lubing your motorcycle chain is a 15-minute job that costs under $25 and can double your chain’s lifespan. Clean it, lube it, wipe off the excess, and check for wear while you’re at it. Do this every 1,000 km and you’ll get tens of thousands of kilometers out of a single chain-and-sprocket set. Your chain is the only thing connecting your engine’s power to the rear wheel — treat it accordingly.