
Your motorcycle won’t idle. It bogs down when you crack the throttle. Maybe it won’t start at all after sitting through winter. Nine times out of ten, the culprit is a dirty carburetor.
Fuel left sitting in carbs for more than 30 days starts forming varnish deposits. After 3–6 months, those deposits harden into a shellac-like coating that blocks jets with openings as small as 0.5 mm. Learning how to clean a carburetor on a motorcycle is one of the most money-saving skills you can pick up — a shop charges $150–$400+ for a carb clean depending on the number of cylinders, while DIY costs under $30 in supplies.
This guide covers two methods: a quick on-bike preventive treatment for mild buildup and the full tear-down for seriously clogged carbs. Both single-carb and multi-carb setups are covered. Let’s get into it.
How to Tell If Your Motorcycle Carburetor Needs Cleaning
Before you tear anything apart, make sure the carb is actually the problem. Here are the key dirty carburetor symptoms motorcycle owners deal with — and the technical reason each one happens.
Hard Starting or Won’t Start
The pilot jet (also called slow jet) is the smallest jet in the carb — typically size 35–48, where the number represents the bore diameter in hundredths of a millimeter. It’s the first to clog because of that tiny orifice. The pilot jet controls fuel delivery at idle and low RPM, so when it’s blocked, the engine doesn’t get enough fuel to fire at cranking speed.
The bike may crank endlessly or only fire with the choke pulled fully on.
Rough or Unstable Idle
A partially blocked pilot jet or pilot circuit passage delivers inconsistent fuel, causing the idle to surge up and down (called a “hunting idle”) or drop to the point of stalling. Adjusting the idle mixture screw won’t fix this if the jet itself is physically obstructed.
Bogging or Hesitation on Acceleration
When you crack the throttle from idle to 1/4 throttle, the slide or butterfly opens and the needle jet and jet needle take over fuel metering. Varnish deposits on the needle jet or a sticky slide cause a lean stumble — the engine bogs momentarily before catching up.
If the main jet (controls fuel at 3/4 to full throttle, typically size 100–160) is partially clogged, you’ll feel a flat spot or power loss at high RPM.
Black Smoke or Strong Fuel Smell
Paradoxically, a dirty carb can run rich too. If varnish prevents the float needle valve from seating properly, the float bowl overfills and floods the engine. Symptoms: fuel dripping from the overflow tube, black spark plugs, strong gas smell, and black smoke from the exhaust. This is technically a float issue, but it’s solved during the same cleaning process.
Poor Fuel Economy
If your bike is suddenly burning 20–30% more fuel than normal without any other changes, a stuck float, partially open enrichment circuit (choke circuit stuck open), or improperly seating needle valve could all be responsible. All are addressed during a carb clean.

Quick Diagnostic Reference
| Symptom | Most Likely Cause | Carb Component to Inspect |
|---|---|---|
| Won’t start / hard start | Clogged pilot jet | Pilot jet, pilot circuit passages |
| Surging / hunting idle | Partially blocked pilot circuit | Pilot jet, idle mixture screw passage, air screw |
| Bog at 1/4 throttle | Dirty needle jet / sticky slide | Needle jet, jet needle, throttle slide |
| No power at high RPM | Clogged main jet | Main jet |
| Fuel overflow / dripping | Stuck float needle | Float valve, float height |
| Black smoke / rich running | Float needle not seating | Float valve seat, float height, overflow |
Method 1 — Preventive Carb Maintenance Without Removing (For Mild Buildup)
For bikes that run but have minor issues — rough idle, slight hesitation — this is the 30-minute approach. You can clean carb without removing it from the bike if the buildup is mild. Important: this method is preventive maintenance. It can dissolve light surface varnish and keep passages from getting worse, but it will NOT clear a physically clogged pilot jet or main jet. If your bike won’t start or idles poorly after sitting for months, skip ahead to Method 2 — you need a full teardown.
Step 1: Add Fuel System Cleaner to the Tank
Use a dedicated carburetor cleaner motorcycle additive: Seafoam Motor Treatment (~$10–$12), Berryman B-12 Chemtool (~$5–$8), or Yamalube Fuel Stabilizer & Conditioner. Typical dosage: 1 oz per gallon of fuel.
Fill the tank at least half full with fresh premium fuel (higher-octane fuel typically contains more detergent additives). Run the engine for 15–20 minutes to circulate the treated fuel through the carbs.
Step 2: Spray Carb Cleaner into the Intake
With the engine idling, remove the air filter (or open the airbox) and spray short bursts of aerosol carb cleaner (Gumout, CRC Carb Cleaner, or Berryman B-12) directly into the carburetor throat. The engine will stumble — that’s normal. Spray 2–3 second bursts, letting the engine recover between sprays. This dissolves light varnish on the butterfly/slide and upper passages.
⚠️ Understand the limitation: The spray enters from the air side of the carburetor and only contacts the throttle plate, slide, and upper air passages. It does NOT reach the pilot jet or main jet — those sit submerged in fuel inside the float bowl, connected through internal passages the spray cannot penetrate. This step cleans surface deposits on accessible parts only.
⚠️ Warning: Do NOT flood the carb with cleaner — too much liquid can hydrolock the cylinder. Short, controlled bursts only.
Step 3: Drain the Float Bowl
Most carbs have a drain screw at the bottom of the float bowl (usually a flat-head or Phillips screw). Place a container underneath and open the drain. Let the old fuel drain completely — it’ll likely be dark yellow or brown (fresh fuel is clear/light yellow). Close the drain and let fresh treated fuel refill the bowl.
Step 4: Adjust the Idle Mixture Screw
After running treated fuel, gently turn the idle mixture screw in until it lightly seats (don’t crank it — just finger-tight), then back it out to the factory baseline setting: typically 1.5–2.5 turns out. Note: Mikuni carbs use air screws, Keihin carbs use fuel screws — the adjustment direction is reversed between them.
⚠️ Note: On most street bikes manufactured after 1980, the idle mixture screw is hidden behind a brass or aluminum EPA anti-tamper plug. This plug was factory-installed to prevent emissions adjustments and must be removed before you can access the screw. The standard procedure: use a small drill bit (1/16″ or 2mm) to carefully drill a shallow hole into the center of the plug — just enough to penetrate the plug itself without touching the screw underneath. Then thread a small sheet metal screw (#4 or #6) into the hole and pull the plug out with pliers. Alternatively, use a pick or awl to pry it out. The plug does not need to be reinstalled.
Fine-tune from there by turning 1/4 turn at a time, seeking the highest stable idle RPM. Then set idle speed to the bike’s spec (usually 1,000–1,300 RPM).
When this method is NOT enough: If the bike still won’t idle, still bogs, or won’t start at all after this treatment, you need the full tear-down method below. Fuel additives can dissolve light varnish but cannot clear a physically plugged jet.

[IMAGE: Hand spraying aerosol carburetor cleaner into the throat of a motorcycle carburetor with the air filter removed — alt: “spraying carb cleaner into motorcycle carburetor throat”]
Method 2 — How to Clean a Carburetor on a Motorcycle (Full Teardown)
This is the complete method — the one that actually fixes stubborn carb issues. Estimated time: 2–4 hours depending on experience and number of carbs.
Step 1: Remove the Carburetor from the Bike
Turn off the fuel petcock (or clamp the fuel line). Disconnect the fuel line, throttle cable(s), choke cable, and any vacuum lines. Loosen the intake boot clamps (the rubber boots connecting the carb to the engine — typically secured with band clamps or Phillips-head screws) and the airbox-side boots. Wiggle the carb out.
On inline-4 bikes with a carb rack (4 carbs bolted together), the whole assembly comes out as one unit — this requires patience and sometimes mild profanity.
⚠️ Pro tip: Take photos of every cable and hose connection BEFORE disconnecting anything. You will forget how it all goes back together. Ask any mechanic.
Step 2: Remove the Float Bowl
Flip the carb upside down. Remove the 4 float bowl screws — usually Phillips or JIS #2. Use the correct screwdriver or you WILL strip them. JIS screwdrivers cost $8–$12 and are worth every cent for Japanese bikes (JIS looks like Phillips but has a different profile).
Carefully separate the float bowl. Inside you’ll find the floats (white or yellow plastic on modern carbs, brass on older bikes), the float needle valve, and the jets.
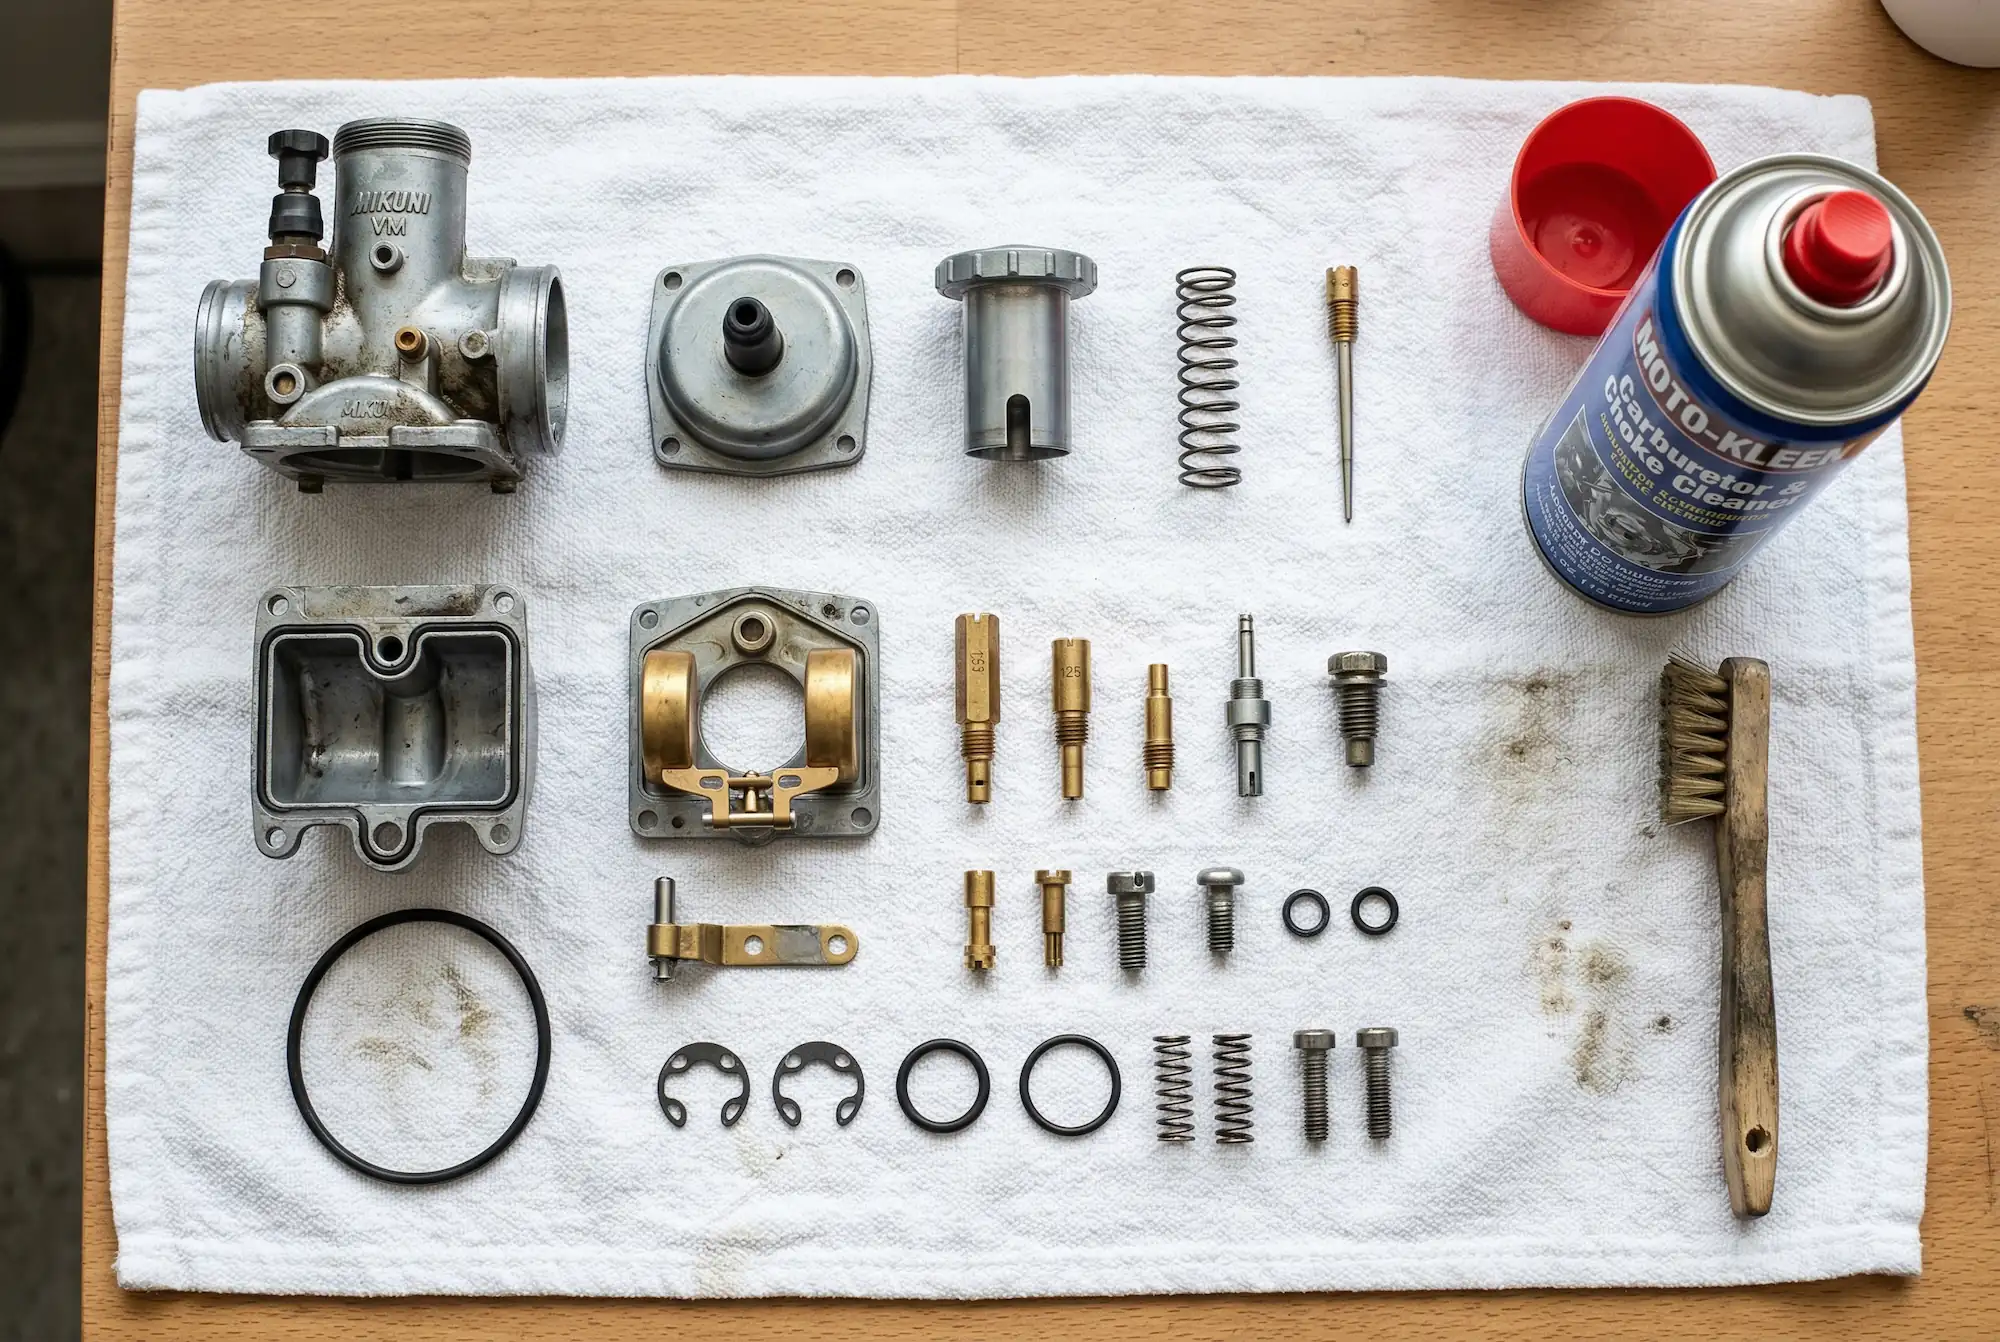
Step 3: Remove All Jets and Small Components
Remove these pieces and keep them organized (an egg carton or magnetic tray works well):
Main jet — unscrew from the center post (emulsion tube). Note the size number stamped on it (e.g., #110, #128).
Pilot/slow jet — smaller jet, usually next to the main jet. Note the size number (e.g., #38, #42).
Jet needle — accessed from the top of the carb by removing the throttle slide. On CV carbs: remove the diaphragm cover, being EXTREMELY careful not to tear the rubber diaphragm — a replacement can cost $30–$80. ⚠️ CV diaphragm warning: These rubber membranes are incredibly fragile. Never spray aerosol carb cleaner directly on a diaphragm — the solvents will cause the rubber to swell and deform permanently (mechanics call this “baconing” because it wrinkles like cooked bacon). Handle diaphragms only with clean hands, inspect them over a light source for pinholes, and clean them with nothing stronger than mild soap and water. A damaged diaphragm means that cylinder runs lean because the slide won’t lift fully — and at $30–$80+ each, they’re one of the most expensive single carb components to replace. The needle sits in the slide and lifts right out.
Float needle valve — remove the float pin, remove the float, and the needle valve either drops out or unscrews.
Idle mixture screw — carefully remove it, noting the exact number of turns to seat it (e.g., “2 turns out from lightly seated”). There’s a tiny O-ring, washer, and spring behind it — DO NOT lose these. They’re $2–$5 to replace but nearly impossible to find at a local shop. Remember: on most post-1980 street bikes, you’ll need to remove the EPA anti-tamper plug first (see Method 1, Step 4 for the procedure).
Step 4: Soak Everything in Carb Cleaner
Place all metal components (jets, needle valve, float bowl, screws) in a container of carb cleaner dip. Recommended products:
Berryman Chem-Dip (the metal can, not the aerosol) — ~$20 for 0.75 gal, aggressive and effective. Soak for 30–60 minutes. Reusable solution.
Pine-Sol or Simple Green — gentler, cheaper option for short soaks of 4–6 hours maximum. ⚠️ Pine-Sol warning: Pine-Sol is effective at dissolving varnish, but it contains acids that attack aluminum and zinc alloys with prolonged exposure. Soaking for 24+ hours can cause white chalky corrosion, permanent gray discoloration, and porous surface damage that ruins the carburetor body. Limit soak time to 4–6 hours (never exceed 8 hours), and immediately rinse all parts thoroughly with clean water after soaking. Blow dry with compressed air and spray with WD-40 right away to prevent flash oxidation. Never soak rubber, plastic, or plated/chromed parts in Pine-Sol.
Ultrasonic cleaner — if you have one, 15–20 minutes in an ultrasonic bath with cleaning solution is the gold standard. A decent ultrasonic cleaner costs $30–$50 and is useful for many other jobs.
⚠️ Warning: Do NOT soak rubber or plastic parts (diaphragms, O-rings, floats, gaskets) in aggressive chemical cleaners. They will swell, deform, or disintegrate. Clean these with mild soap and water only.
Step 5: Clear Every Jet and Passage with Compressed Air and Wire
After soaking, hold each jet up to a light source and look through it. You should see a clean, round, unobstructed hole. If not:
Use a single strand of copper wire (stripped from a standard electrical cable) or a nylon bristle from a stiff brush to gently push through the orifice. NEVER use steel wire, paperclips, guitar strings, welding tip cleaners, or drill bits. Brass jets are very soft (Mohs hardness ~3-4). Steel is significantly harder and will scratch or enlarge the jet bore, permanently altering the calibrated fuel flow. Even a single pass with steel wire can enrich the mixture on that circuit. Copper wire (Mohs ~3) is softer than brass and safe to use — twist multiple strands together if you need a thicker probe.
Blow compressed air through every passage in the carb body: pilot circuit passages (usually 3–4 tiny holes in the carb throat connected to the pilot circuit), main jet well, emulsion tube holes, choke circuit.
Pay special attention to the pilot circuit passages — these are the smallest and most commonly clogged.
Step 6: Inspect and Replace Worn Parts
Check these common wear items:
Float needle valve tip — if the rubber tip is grooved, cracked, or hardened, replace it. A worn needle valve causes constant fuel overflow. Replacement: $8–$20.
Float needle valve seat — the brass seat the needle presses against. If it’s pitted or corroded, fuel leaks past. Some seats are replaceable; some require the entire valve assembly.
Float integrity check — before reinstalling, hold each float next to your ear and shake it gently. If you hear liquid sloshing inside, the float is punctured and waterlogged (or fuel-logged). A saturated float sinks lower than it should, causing the float bowl to overfill and the engine to flood. This is a common hidden cause of persistent overflow that’s easy to miss during cleaning. Replacement floats cost $10–$30. Brass floats can sometimes be soldered by a skilled mechanic, but plastic floats with internal fuel must be replaced.
Diaphragm (CV carbs) — hold it up to a light. Any pinholes, tears, or stiffened areas = replace. A torn diaphragm causes that cylinder to run lean because the slide won’t lift fully.
O-rings — inspect all O-rings for cracks, hardness, or flattening. A carb rebuild kit ($15–$40 for single-carb, $30–$80 for inline-4) includes all gaskets, O-rings, and float needle — it’s often worth buying even if you only replace a few pieces.
Step 7: Reassemble and Reinstall
Reinstall all jets to their original positions — finger-tight, then 1/8 turn with a screwdriver. Do NOT over-torque jets; they’re brass and strip easily. Set the idle mixture screw to factory baseline (typically 1.5–2.5 turns out). Reinstall the float bowl with a new gasket if included in the rebuild kit. Reinstall the carb on the bike in reverse order of removal.
Step 8: Post-Cleaning Startup and Adjustment
Turn on the fuel petcock and check for leaks at all connections. Start the engine — it may take extra cranking after a carb job. Let it warm up fully (3–5 minutes), then fine-tune the idle mixture screw and idle speed as described in Method 1, Step 4.
If you have a multi-carb bike, synchronize the carbs using a vacuum gauge set ($30–$80) — this ensures all cylinders pull the same vacuum at idle, which is essential for smooth running. More on this below.
Carburetor Cleaning Products Compared
Here’s a head-to-head comparison of the most popular motorcycle carburetor cleaning products.
| Product | Type | Best For | Soak Time | Approx. Cost | Notes |
|---|---|---|---|---|---|
| Berryman Chem-Dip | Chemical dip (metal can) | Heavy varnish, full teardown soaks | 30–60 min | ~$20 (0.75 gal) | Aggressive — metal parts only, reusable solution |
| Berryman B-12 Chemtool | Aerosol spray | Quick spray cleaning, passage flushing | Instant (spray) | ~$5–$8 per can | Great for blasting through passages and spot cleaning |
| Gumout Carb Cleaner | Aerosol spray | General-purpose spray cleaning | Instant (spray) | ~$5–$7 per can | Widely available, decent for light buildup |
| CRC Carb Cleaner | Aerosol spray | Throat spraying, light deposits | Instant (spray) | ~$5–$6 per can | Sensor-safe formula, good all-around |
| Seafoam Motor Treatment | Fuel additive | Mild deposits, in-tank prevention | Run through engine (20–30 min) | ~$10–$12 (16 oz) | Gentle, good for prevention — not heavy clogs |
| Pine-Sol / Simple Green | Household cleaner | Budget short soak | 4–6 hours max | ~$4–$6 | Effective but time-sensitive — attacks aluminum/zinc alloys if left too long. Rinse immediately, dry and protect with WD-40 |
| Ultrasonic cleaner + solution | Ultrasonic machine | Best results for full cleans | 15–20 min | $30–$50 machine + ~$10 solution | Gold standard — also useful for many other parts |
Motorcycle Carb Rebuild Kit — Is It Worth It?
A carb rebuild kit typically costs $15–$40 for single-carb bikes and $30–$80 for inline-4 kits. The kit includes: all gaskets, float bowl O-ring, idle mixture screw O-ring + washer + spring, float needle valve, and sometimes jet needle clips.
Whether it’s worth buying depends on the age and condition of the carb:
Bike sat for 1–3 years? Kit is recommended. Rubber seals deteriorate from fuel exposure and age, and the float needle valve is likely worn.
Bike sat for 6+ months but runs? You can probably get away with just cleaning, but inspect all O-rings carefully.
Bike is 15+ years old with original carb parts? Definitely buy the kit. Rubber components have a finite lifespan regardless of use.
Common aftermarket rebuild kit brands: K&L Supply (from ~$22+), Keyster (made in Japan, excellent quality), Shindy, and All Balls Racing. OEM kits from Honda, Yamaha, Kawasaki, and Suzuki are pricier ($40–$100+) but guarantee exact fit. For popular bikes like the Honda CB series, Yamaha XS/SR, Kawasaki KZ, and Suzuki GS, aftermarket kits are widely available and perfectly adequate.
Multi-Carb Synchronization After Cleaning
If your bike has 2 or 4 carburetors, cleaning alone isn’t the end of the job. After reassembly, the carbs must be synchronized so that each cylinder pulls the same amount of vacuum at idle. Out-of-sync carbs cause rough idle, uneven power delivery, and vibration.
Tools needed: a vacuum gauge sync set ($30–$80). The Morgan Carbtune Pro ($85–$140 depending on 2- or 4-column) is the most popular stick-type synchronizer — it replaced the older Carbtune II and uses stainless steel rods instead of mercury. Alternatively, a set of 4 analog gauges with damper valves runs $30–$50.
Process overview:
- Connect vacuum gauges to the intake manifold vacuum ports on each cylinder.
- Start the engine and warm it up fully.
- Identify the “master” or “base” carburetor. This is the carb connected directly to the throttle cable linkage — usually carb #2 or #3 on an inline-4. The master carb has no individual throttle adjustment screw because it sets the baseline that all other carbs match. Check your service manual to confirm which carb is the master on your specific bike.
- Adjust the sync screws between the remaining carburetors to match the vacuum reading of the master carb. Do NOT try to move all screws randomly — the master stays fixed, and the others are adjusted to match it. On an inline-4, you typically balance carb #1 to #2 (one screw), then #3 to #4 (another screw), then balance both pairs with a center screw between #2 and #3.
- This typically takes 15–30 minutes.
⚠️ If you cannot get one cylinder to match the others no matter how much you adjust: stop. This usually indicates a problem outside the carburetor — tight valves (low valve clearance), a vacuum leak at the intake boots, or low cylinder compression. A carb sync only works correctly when the engine’s mechanical condition is sound. Check valve clearances and intake boot integrity before blaming the carbs.
Note: Single-cylinder bikes and many V-twins with independent carbs don’t need synchronization.

Frequently Asked Questions
Can I clean a motorcycle carburetor without removing it?
For mild issues (light varnish from sitting a few months), you can perform preventive maintenance — add fuel system cleaner to the tank, spray carb cleaner into the throat, and drain the float bowl. However, understand that this only treats accessible surfaces and upper air passages. The pilot jet — the most commonly clogged component — sits submerged in fuel inside the float bowl, and spray cleaner entering from the air side cannot reach it. This method works as preventive maintenance maybe 40–50% of the time for bikes that still run. For serious clogs (bike won’t start, sat for a year+), you almost always need to remove the carb for a full teardown. The pilot jet can’t be accessed without removing the float bowl.
How often should I clean my motorcycle carburetor?
If you ride regularly and use fresh fuel, you may never need a full cleaning. Preventive measures: use fuel stabilizer (like Sta-Bil) if the bike will sit more than 2 weeks, run the carb dry before storage by turning off the petcock and letting the engine stall, and use premium fuel with more detergents. Adding Seafoam or B-12 Chemtool to a tank of fuel once per season is solid preventive maintenance.
What’s the difference between a pilot jet and a main jet?
The pilot jet (also called slow jet) controls fuel delivery at idle and low RPM (0–1/4 throttle). It’s the smallest jet in the carb, typically size 35–48. The main jet controls fuel at 3/4 to full throttle and is much larger (size 100–160). Between them, the jet needle and needle jet handle the mid-range. A clogged pilot jet is the #1 cause of hard starting and rough idle on carbureted bikes.
Can I use automotive carburetor cleaner on a motorcycle carb?
Yes — most automotive carb cleaners (Gumout, CRC, Berryman) work perfectly on motorcycle carbs. The chemistry is identical. However, avoid cleaners containing methylene chloride on plastic or rubber parts — check the label. For soaking, Berryman Chem-Dip is the safest aggressive option. Pine-Sol works well for a budget soak but limit it to 4–6 hours on aluminum parts (see warnings above). For clearing jets, use copper wire only — never steel wire or abrasive tools on brass components.
My carb is clean but the bike still runs poorly — what else could it be?
If the carb is genuinely clean and properly reassembled, check these common culprits: vacuum leaks at the intake boots (spray carb cleaner around the boots while idling — if RPM changes, there’s a leak), worn intake boots ($15–$30 each), clogged fuel petcock filter, kinked or deteriorated fuel line, old spark plugs, weak ignition coils, or low valve clearance. On older bikes, a compression test ($15 for a tester) can rule out worn rings or valves.
How do I know if my float is bad?
Hold the float next to your ear and shake it gently. If you hear liquid sloshing inside, the float has a pinhole leak and is filling with fuel internally. A waterlogged float sits lower than it should, overfilling the float bowl and flooding the engine with fuel. Symptoms include persistent overflow from the drain tube, fuel smell, and a rich condition that won’t go away even with a new float needle valve. Plastic floats with internal fuel must be replaced ($10–$30). Brass floats can sometimes be repaired by soldering the pinhole, but replacement is more reliable.
Wrapping Up
Learning how to clean a carburetor on a motorcycle is a skill that pays for itself immediately. A $150–$400 shop bill becomes a $20–$30 DIY job once you know the process. Start with the preventive on-bike method if the bike runs but is rough, and escalate to the full teardown if that doesn’t solve it.
Take photos, label everything, don’t lose those tiny O-rings, and you’ll have the carb sorted in an afternoon.