
A proper motorcycle chain adjustment is one of those jobs that takes 15 minutes but can save you from a genuinely dangerous situation. A loose chain doesn’t just rattle and make noise — it can jump off the sprocket mid-ride, chew into your swingarm, or lock the rear wheel at speed. A chain that’s too tight isn’t much better: it destroys output shaft bearings and kills suspension travel.
This is the single most important regular maintenance task on any chain-drive motorcycle. And yet most riders either ignore it or do it wrong.
This guide covers everything: when to adjust, what tools you need, the correct slack measurement for your bike, a full 10-step adjustment process, rear wheel alignment, and the five mistakes that cause the most damage. Whether you’re on a 125cc commuter or an adventure bike, the process is the same.
Let’s get your chain dialed in.

How Often Should You Adjust Your Motorcycle Chain?
The general rule is every 500–1,000 km, or before any long ride. If you’ve been riding in rain, mud, or dusty conditions, check it sooner — water washes out lubricant and grit accelerates wear, both of which affect chain slack faster than normal riding.
Brand new chains wear in noticeably in the first 500 km as the pins and rollers seat themselves. Note: When we say a chain “stretches,” it doesn’t physically elongate like rubber. What actually happens is the metal pins and bushings wear internally, increasing the distance between link centers (the “pitch”). The effect mimics stretching, but it’s actually material loss — and it’s irreversible. During this break-in period, check tension every 200–300 km. After that, the wear rate slows down considerably.
Signs your chain needs attention right now:
- Visible sag in the bottom run of the chain — more than a fist’s width of droop
- Chain slapping noise, especially when you chop the throttle
- Chain touching or rubbing the swingarm
- Rough or clunky gear shifts that weren’t there before
- Kinked or stiff links that don’t flex freely when you rotate the wheel — these indicate internal pin/bushing damage, not just surface issues
- Red-brown rust dust falling from the chain — this signals dry, oxidizing internal pivots (failed O-rings) and is far more serious than cosmetic surface rust on the side plates, which can simply be cleaned off
If any of those are present, stop riding and adjust (or replace) before your next trip.
Signs your chain needs attention right now:
- Visible sag in the bottom run of the chain — more than a fist’s width of droop
- Chain slapping noise, especially when you chop the throttle
- Chain touching or rubbing the swingarm
- Rough or clunky gear shifts that weren’t there before
- Visible rust or stiff links when you rotate the wheel
If any of those are present, stop riding and adjust before your next trip.
Tools You’ll Need
Nothing exotic here. You probably have most of this already.
- Rear paddock stand or center stand — useful for spinning the wheel and making adjustments. However, final slack measurement should be taken in the position your manual specifies (usually on the side stand — see “What’s the Correct Chain Slack?” below for why this matters)
- Socket wrench for the rear axle nut — size varies by bike (commonly 22mm, 24mm, 27mm, or 32mm — check your manual)
- Wrenches for the chain adjuster bolts — typically 10mm or 12mm, both sides
- Torque wrench — for final axle nut tightening to spec (non-negotiable)
- Ruler or tape measure — for measuring chain slack in mm
- Chain lube — since you’re already down there, you’re going to lube it when you’re done
- New cotter pin (if applicable) — many bikes (especially Kawasaki Ninja series, KLR, Versys, various Honda and Yamaha models) use a castle nut on the rear axle secured with a cotter pin. These should ideally be replaced each time they’re removed. They cost pennies — keep a few spares in your tool kit. Check your axle nut type before starting
- Chain cleaner and a brush — you’ll want to clean the chain before measuring slack, as built-up grit between rollers and sprocket teeth can falsify your measurement
- Optional: chain alignment tool or laser aligner — more accurate than the swingarm marks

What’s the Correct Chain Slack?
Here’s the general guideline:
| Bike Type | Slack (mm) | Slack (inches) |
|---|---|---|
| Street / Sport / Naked | 25–35 mm | 1.0–1.4 in |
| Cruiser / Touring | 30–40 mm | 1.2–1.6 in |
| Dirt / Adventure / Dual Sport | 35–50 mm | 1.4–2.0 in |
⚠️ Always check your owner’s manual. Every bike has a specific slack spec, and some vary significantly from these ranges. Many bikes also have a chain slack sticker on the swingarm — look for it before you start.
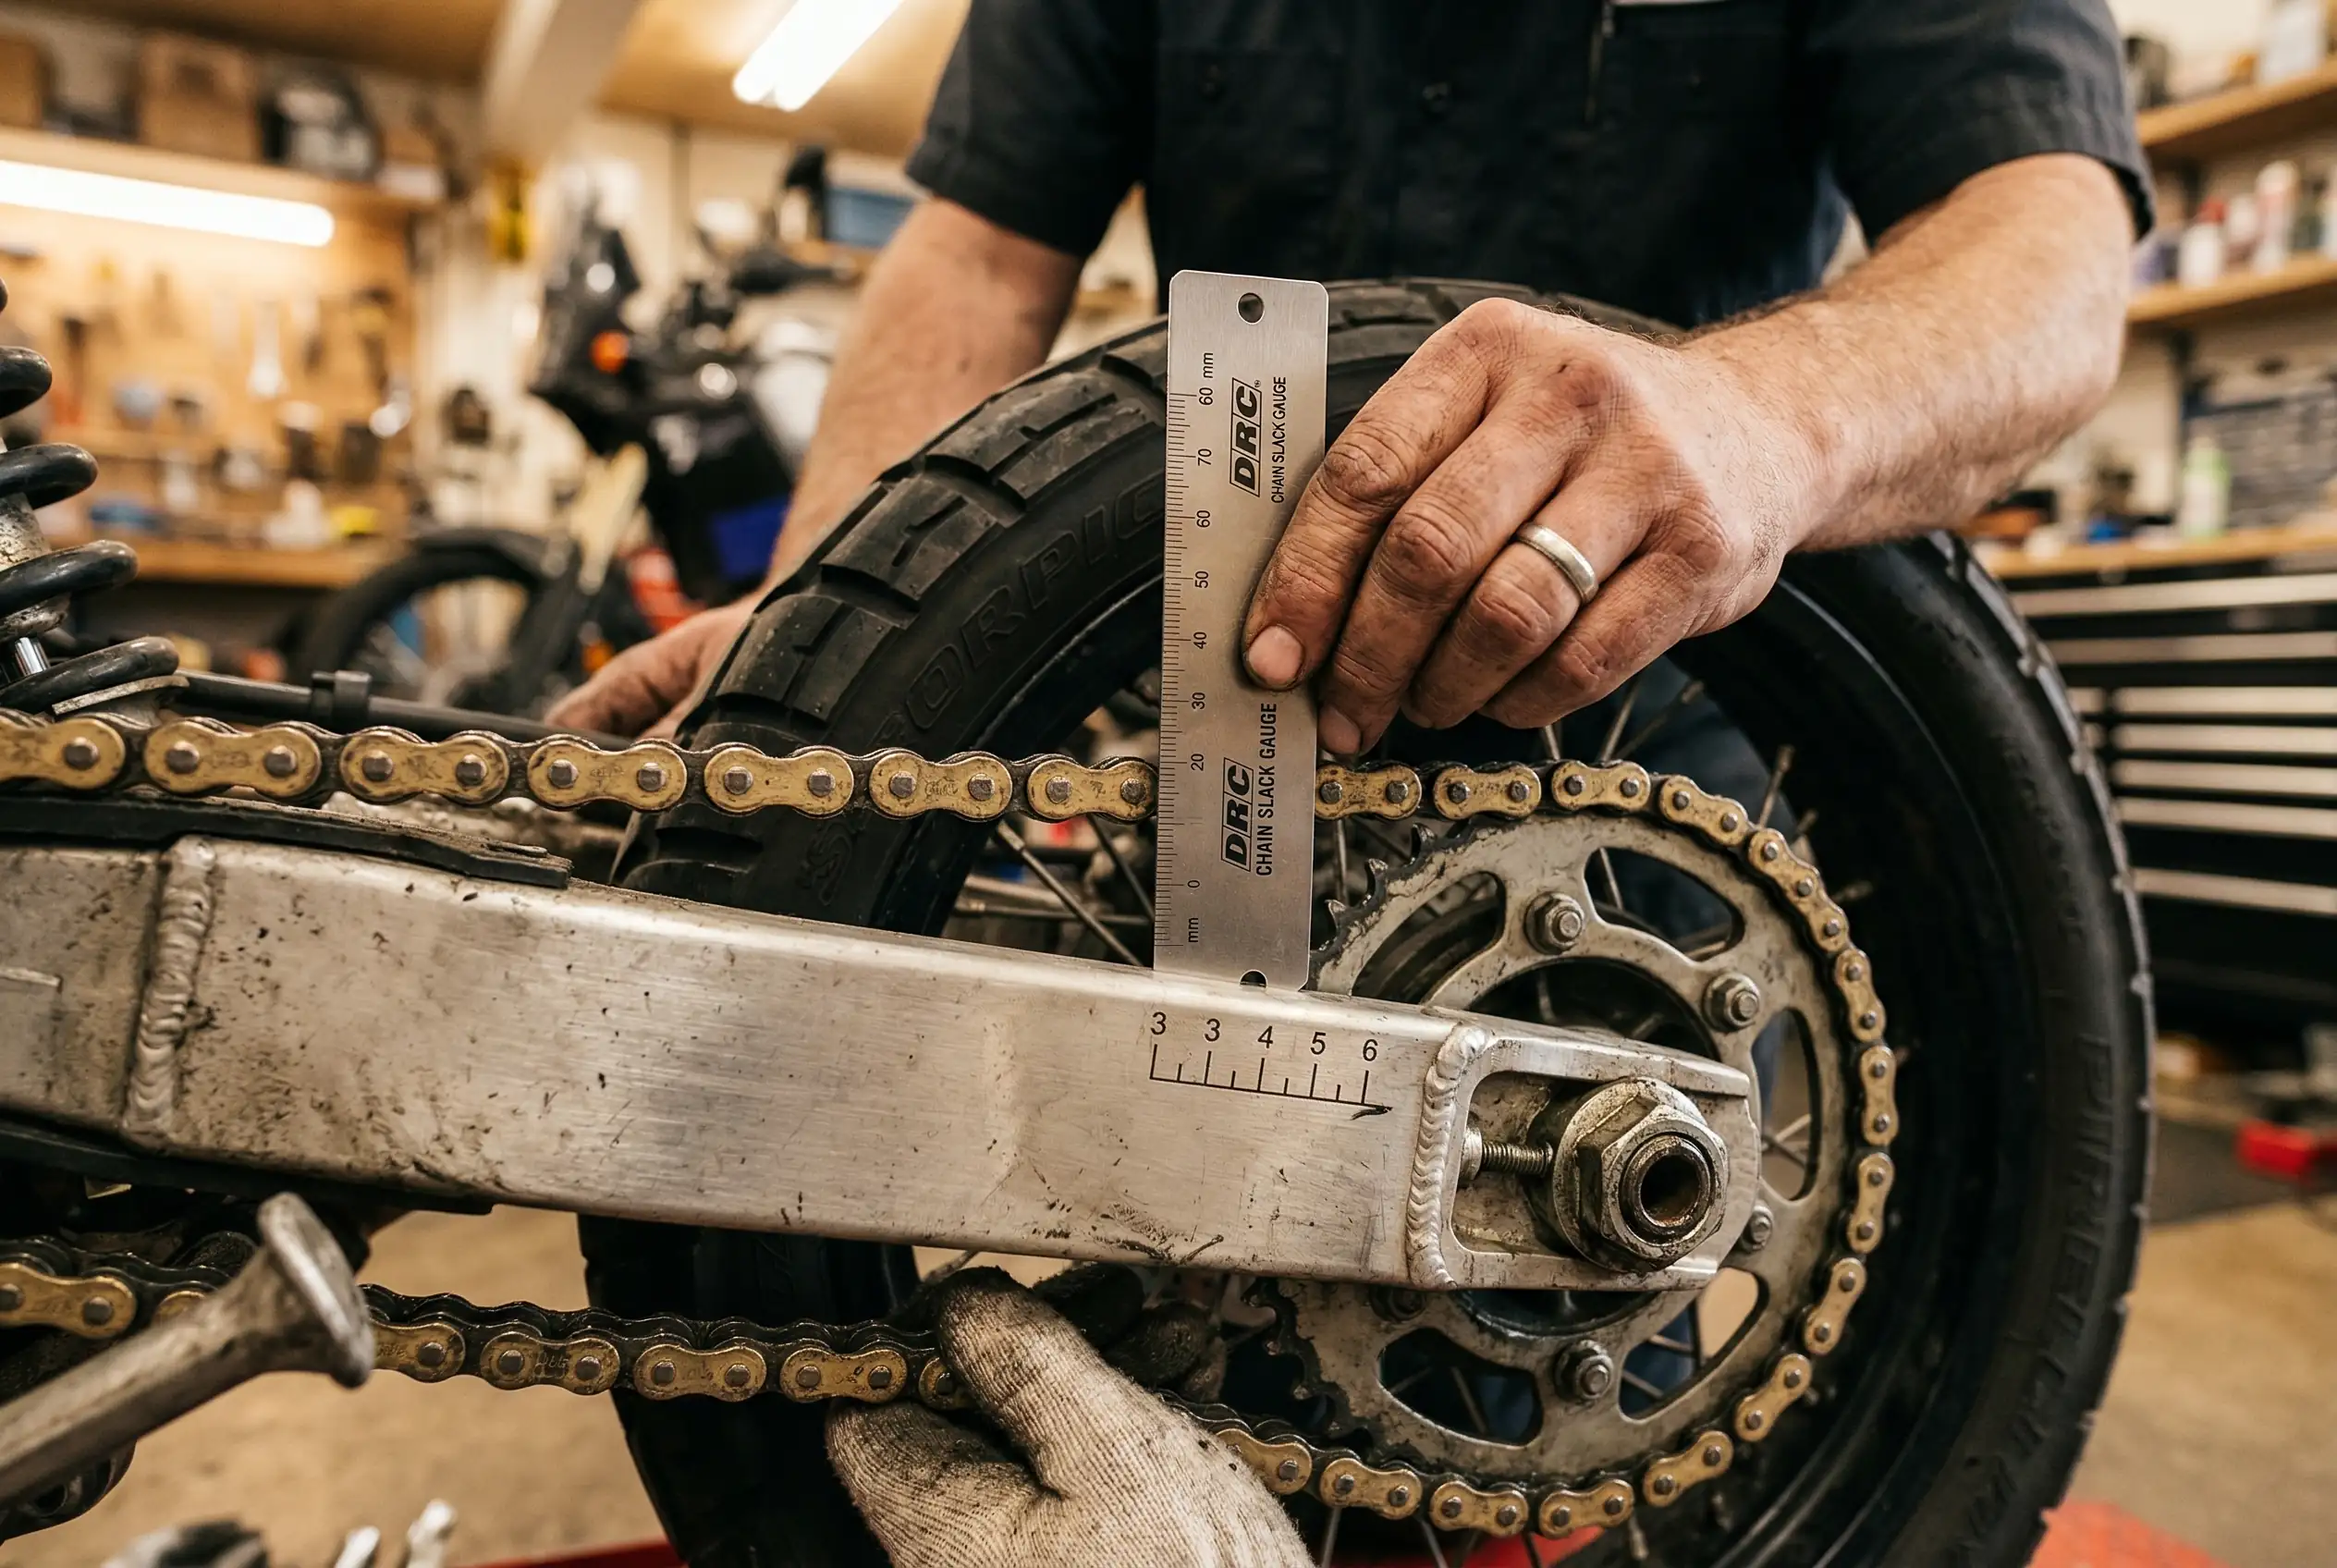
Where to measure: Find the midpoint between the front sprocket (countershaft) and the rear axle. Measure on the bottom run of the chain — the section hanging between the two sprockets underneath.
How to measure: At that midpoint, push the chain down to its lowest point with one finger. Then push it up to its highest point. The vertical distance between those two positions is your motorcycle chain slack. A simple ruler against the swingarm works fine.
⚠️ Important: Not all manufacturers use this “total deflection” method. Some brands — notably KTM and Husqvarna adventure models — specify measuring the distance from the bottom of the swingarm guard to the top of the chain, rather than total up-and-down movement. Always follow the exact measurement method described in YOUR manual, not a generic guide.
The position you measure FROM matters just as much as the measurement itself. Most service manuals specify checking slack with the bike on the side stand, because the specified slack range is calibrated for that suspension position. The reason is geometry: chain tension changes as the swingarm moves through its arc. When the rear suspension is fully extended (like on a center stand or paddock stand with the wheel hanging free), the chain appears looser — typically 3–8 mm more slack than on the side stand. If you adjust to the minimum spec while on a center stand, the chain will be over-tight once you sit on the bike and load the suspension. This is one of the most common causes of premature countershaft bearing failure.
Practical approach: Use a paddock or center stand to spin the wheel, find tight spots, and physically turn the adjuster bolts. Then lower the bike to the side stand (or whatever position your manual specifies) to take your final slack measurement. Best of both worlds.
Critical step most guides skip: Before you measure, rotate the rear wheel slowly and check slack at several different points around the chain. Chains don’t wear evenly — there’s always a tight spot and a loose spot. You must find the tightest point and adjust from there. If you adjust at a loose spot, the tight spot becomes over-tightened, which damages bearings and sprockets.d check slack at several different points around the chain. Chains don’t wear evenly — there’s always a tight spot and a loose spot. You must find the tightest point and adjust from there. If you adjust at a loose spot, the tight spot becomes over-tightened, which damages bearings and sprockets.

How to Adjust Your Motorcycle Chain: Step by Step
Here’s the full chain tension adjustment process. Take your time on the first go — it gets faster every time.
Step 1 — Prepare the Bike and Clean the Chain
Use a center stand or paddock stand to get the rear wheel off the ground so it spins freely. Put the bike in neutral and make sure the engine is off. Before measuring anything, clean the chain with a chain cleaner and brush. Built-up grit between the rollers and sprocket teeth can add false “tightness” and throw off your slack reading. You don’t need a full detail — just knock off the heavy grime so the chain runs freely.
Step 2 — Find the Tight Spot
Rotate the rear wheel slowly by hand. Every quarter-turn, press the bottom chain run up and down to feel the slack. You’ll notice it changes — some spots are looser, others tighter. Mark the tightest spot with a piece of tape or chalk on the chain. This is where you’ll measure and adjust from.
If you adjust at the loosest point instead, you’ll over-tighten the chain at the tight spot — one of the most common and damaging mistakes riders make.
Step 3 — Measure Current Slack
With the chain at its tight spot, lower the bike to the position your manual specifies for measurement (usually the side stand). Go to the midpoint of the bottom run. Push the chain down, then push it up. Measure the vertical movement in millimeters. Compare this to your bike’s spec (manual or swingarm sticker). If it’s within range, you’re done — go lube it and ride. If not, put the bike back on the stand and keep going.
Step 4 — Loosen the Rear Axle Nut
If your bike has a castle nut with a cotter pin, remove the cotter pin first (and discard it — you’ll install a fresh one at the end). Using your socket wrench, loosen the rear axle nut just enough to allow the wheel to slide back and forth in the swingarm slots. Do not remove the nut entirely. The wheel stays on the axle — you’re just releasing the clamping force so the adjusters can do their job.
Step 5 — Loosen the Adjuster Lock Nuts
On each side of the swingarm, you’ll find chain adjuster bolts with lock nuts. Loosen the lock nuts on both sides. These lock the adjusters in position once you’ve set the tension. Some bikes use a snail-cam adjuster or eccentric instead of bolts — the concept is the same.
Step 6 — Turn the Chain Adjusters
This is where the actual motorcycle chain adjustment happens. Turn the adjuster bolts to move the rear axle backward (tightening the chain) or forward (loosening it). On most bikes, clockwise tightens (moves wheel back).
⚠️ Critical: adjust both sides equally. If you give the right side two quarter-turns, give the left side two quarter-turns. Unequal adjustment pushes the rear wheel out of alignment — which causes uneven tire wear, unpredictable handling, and accelerated chain and sprocket wear.
Work in quarter-turn increments. Small moves. Check slack between each adjustment.
Step 7 — Check Slack Again
After each pair of quarter-turns, lower the bike to the measurement position and re-measure the slack at the tight spot. Keep adjusting until the measurement falls within your bike’s specified range. Don’t try to hit the exact middle of the spec — anywhere within the range is correct. Slightly loose is safer than slightly tight.
Step 8 — Verify Rear Wheel Alignment
Look at the alignment marks on both sides of the swingarm. The adjuster position should be at the same mark on both sides. If they don’t match, the wheel is misaligned.
Swingarm marks aren’t always precise, though. For a more accurate check, use a string alignment method (run a string from the rear axle along both sides of the tire, checking the distance at the front) or a laser alignment tool. A misaligned rear wheel creates handling issues and chews through tires unevenly.
Step 9 — Lock Everything Down
Before torquing the axle nut, prevent the axle from shifting forward. Insert a sturdy screwdriver or thick rag between the chain and the rear sprocket teeth, then rotate the wheel backward so the chain pulls the axle firmly against the adjusters. This “locks” the wheel position against the adjustment points. Without this step, the rotational force of tightening the nut often pushes the axle forward, loosening the chain tension you just set.
Now tighten the rear axle nut to the manufacturer’s torque spec. This is not a “good and tight” situation — use your torque wrench. Common specs range from 80–130 Nm depending on the bike (check your manual). If your bike uses a castle nut, torque to spec, then advance the nut slightly (if needed) to align the cotter pin hole. If the hole overshoots, back off to the previous alignment point rather than over-torquing. Install a new cotter pin and bend the ends around the nut.
Then tighten the adjuster lock nuts. Order matters: axle first, then lock nuts. Doing it backwards can shift the adjustment. Finally, remove the screwdriver/rag from the sprocket.
Step 10 — Final Check and Lube
Spin the rear wheel freely. It should rotate without any binding or tight spots where the chain resists. If it binds, you’ve over-tightened — back off the adjusters slightly and re-check.
Re-measure the slack one final time in the correct measurement position (side stand, etc.). Tightening the axle nut can shift things slightly, so confirm you’re still within spec.
Now lube the chain. You’ve already got the wheel off the ground and you’re right there — there’s no better time. Spray chain lube along the inner side of the chain while slowly rotating the wheel. Let it sit for 5 minutes before riding to let the lube penetrate the O-rings.

5 Common Chain Adjustment Mistakes
1. Adjusting at the loosest point instead of the tightest. This is mistake number one. The chain has natural variation in tension around its loop. If you set the slack at a loose spot, the tight spot becomes over-tightened — stressing the output shaft bearing and accelerating wear on everything in the drivetrain.
2. Unequal adjustment on left and right sides. Every extra quarter-turn on one side vs. the other pushes the rear wheel out of alignment. Even a small misalignment shows up as uneven rear tire wear within a few hundred km. Always count your turns on both sides.
3. Over-tightening the chain. A too-tight chain is worse than a slightly loose one. It puts constant stress on the countershaft bearing (an expensive repair), reduces rear suspension travel because the chain fights the swingarm movement, and wears the chain and sprockets much faster. Here’s why: the chain reaches maximum tension when the countershaft sprocket, the swingarm pivot, and the rear axle form a straight line (full suspension extension). Slack exists specifically to accommodate this geometry. A chain with no slack at rest becomes dangerously tight at that point in suspension travel, potentially snapping or destroying bearings. When in doubt, err on the looser side of the spec range.
4. Not torquing the axle nut. “Hand-tight plus a bit” is not an axle nut torque spec. An under-torqued axle can shift during riding, changing your alignment and chain tension on the move. Use a torque wrench. Every time. And if your bike has a castle nut, always install a cotter pin — even if you think the nut is “tight enough.” It’s your last line of defense against axle nut failure.
5. Adjusting a worn-out chain that needs replacing. If the chain has tight spots that can’t be adjusted out, stiff links that won’t free up with cleaning and lube, or if you can pull the chain off the rear sprocket and see daylight under it past half a tooth — the chain is done. Adjusting won’t fix wear. It needs replacement.
When to Replace Instead of Adjust
Chain adjustment only works when the chain is still in serviceable condition. Here’s when adjustment isn’t enough and you need a new chain and sprocket set:
- Chain stretch test fails: Grab the chain at the 3 o’clock position on the rear sprocket and pull it away from the sprocket. If you can see more than half a sprocket tooth exposed underneath, the chain is stretched beyond service limits.
- Stiff links won’t free up: If individual links don’t flex smoothly even after thorough cleaning and lubrication, the rollers or pins are damaged internally.
- Red-brown dust or debris: If you see reddish dust falling from the chain — especially around the rollers — the O-rings have failed and the internal pivots are oxidizing and grinding. This is structural failure in progress. Surface rust on the outer plates is cosmetic and can be cleaned, but internal rust is a replacement signal.
- Sprocket teeth look like shark fins: Healthy sprocket teeth are symmetrical and rounded at the tip. Worn teeth become pointed, hooked, or lean to one side. If your sprockets look like this, they’re done.
- You’ve reached the end of the adjuster range: If both adjusters are maxed out and the chain is still loose, you’ve used up all the adjustment. The chain has worn as far as it can go.
⚠️ Always replace the chain and both sprockets together. A new chain on worn sprockets (or vice versa) wears out dramatically faster because the pitch doesn’t match. It’s a false economy. Buy the set.
FAQ
Can I adjust my motorcycle chain without a stand?
Yes, but it’s harder. You can have someone sit on the bike to hold it upright while you work, or prop the bike securely against a wall and roll it to rotate the wheel. A paddock stand makes the job much easier and safer, though — they’re worth the $40–60 investment if you do your own maintenance. Just remember: measure final slack in the position your manual specifies, which is usually the side stand.
What happens if my chain is too tight?
Excessive chain tension puts constant strain on the countershaft bearing and output shaft seal — both expensive repairs. It also reduces rear suspension travel because the chain restricts swingarm movement, and it accelerates wear on the chain and sprockets. In extreme cases, a chain under too much tension can snap.
How do I know if my chain needs adjustment or replacement?
If you can set the slack within the manufacturer’s spec and the chain runs smoothly without tight spots or stiff links, adjustment is all it needs. If the chain is visibly stretched beyond the adjuster range, has kinked links, red rust dust from failed O-rings, deep rust, or the sprocket teeth are hooked and pointed, it’s time for a full chain and sprocket replacement.
Does chain slack change when I sit on the bike?
Yes — noticeably. Your weight compresses the rear suspension, which changes the geometric relationship between the countershaft sprocket, swingarm pivot, and rear axle. This typically tightens the chain by 3–8 mm compared to unloaded measurements. That’s why some manufacturers specify that motorcycle chain slack should be checked with a rider sitting on the bike in normal riding position. Always follow the method your manual specifies.
Should I lube the chain after adjusting?
Absolutely. You already have the rear wheel off the ground and clear access to the full chain. It’s the perfect time to apply fresh chain lube to the inside of the chain while slowly rotating the wheel. Let it soak in for a few minutes before riding.
Does my bike have a cotter pin on the rear axle?
Check your axle nut. If it has a “castle nut” (a nut with slots cut into the top, resembling castle turrets) and a small metal pin passing through a hole in the axle shaft, that’s a cotter pin setup. Many Kawasaki, Honda, and Yamaha models use this system. If your bike has a plain hex nut or a nyloc (self-locking) nut, there’s no cotter pin to worry about. When in doubt, check your manual or look at your axle — the pin is hard to miss.
Wrapping Up
Motorcycle chain adjustment is a 15-minute job that protects hundreds of dollars’ worth of drivetrain components. Do it every 500–1,000 km, always find the tight spot before adjusting, keep both sides equal, measure slack in the position your manual specifies, and torque the axle nut properly. That’s it.
Your chain will last longer, your sprockets will stay healthy, and your bike will handle the way it should.
Now that your chain tension is sorted, keep it running smooth — check out our guide on how to clean and lube your motorcycle chain.