
Every motorcycle tire is either tubed (TT) or tubeless (TL) — and the type you have isn’t usually a matter of preference. It’s determined by your wheel type. Spoked wheels generally require tubes because the spoke nipple holes in the rim can’t hold air. Cast alloy wheels use tubeless tires because the solid rim creates an airtight seal. Understanding the difference between tube vs tubeless motorcycle tires matters because it affects how you handle punctures, what repair kit to carry, how much your tires cost, and what your options are if you want to convert.
This guide breaks down every real-world difference between tubed and tubeless motorcycle tires, compares repair procedures side by side, and gives you a decision framework based on your riding style.
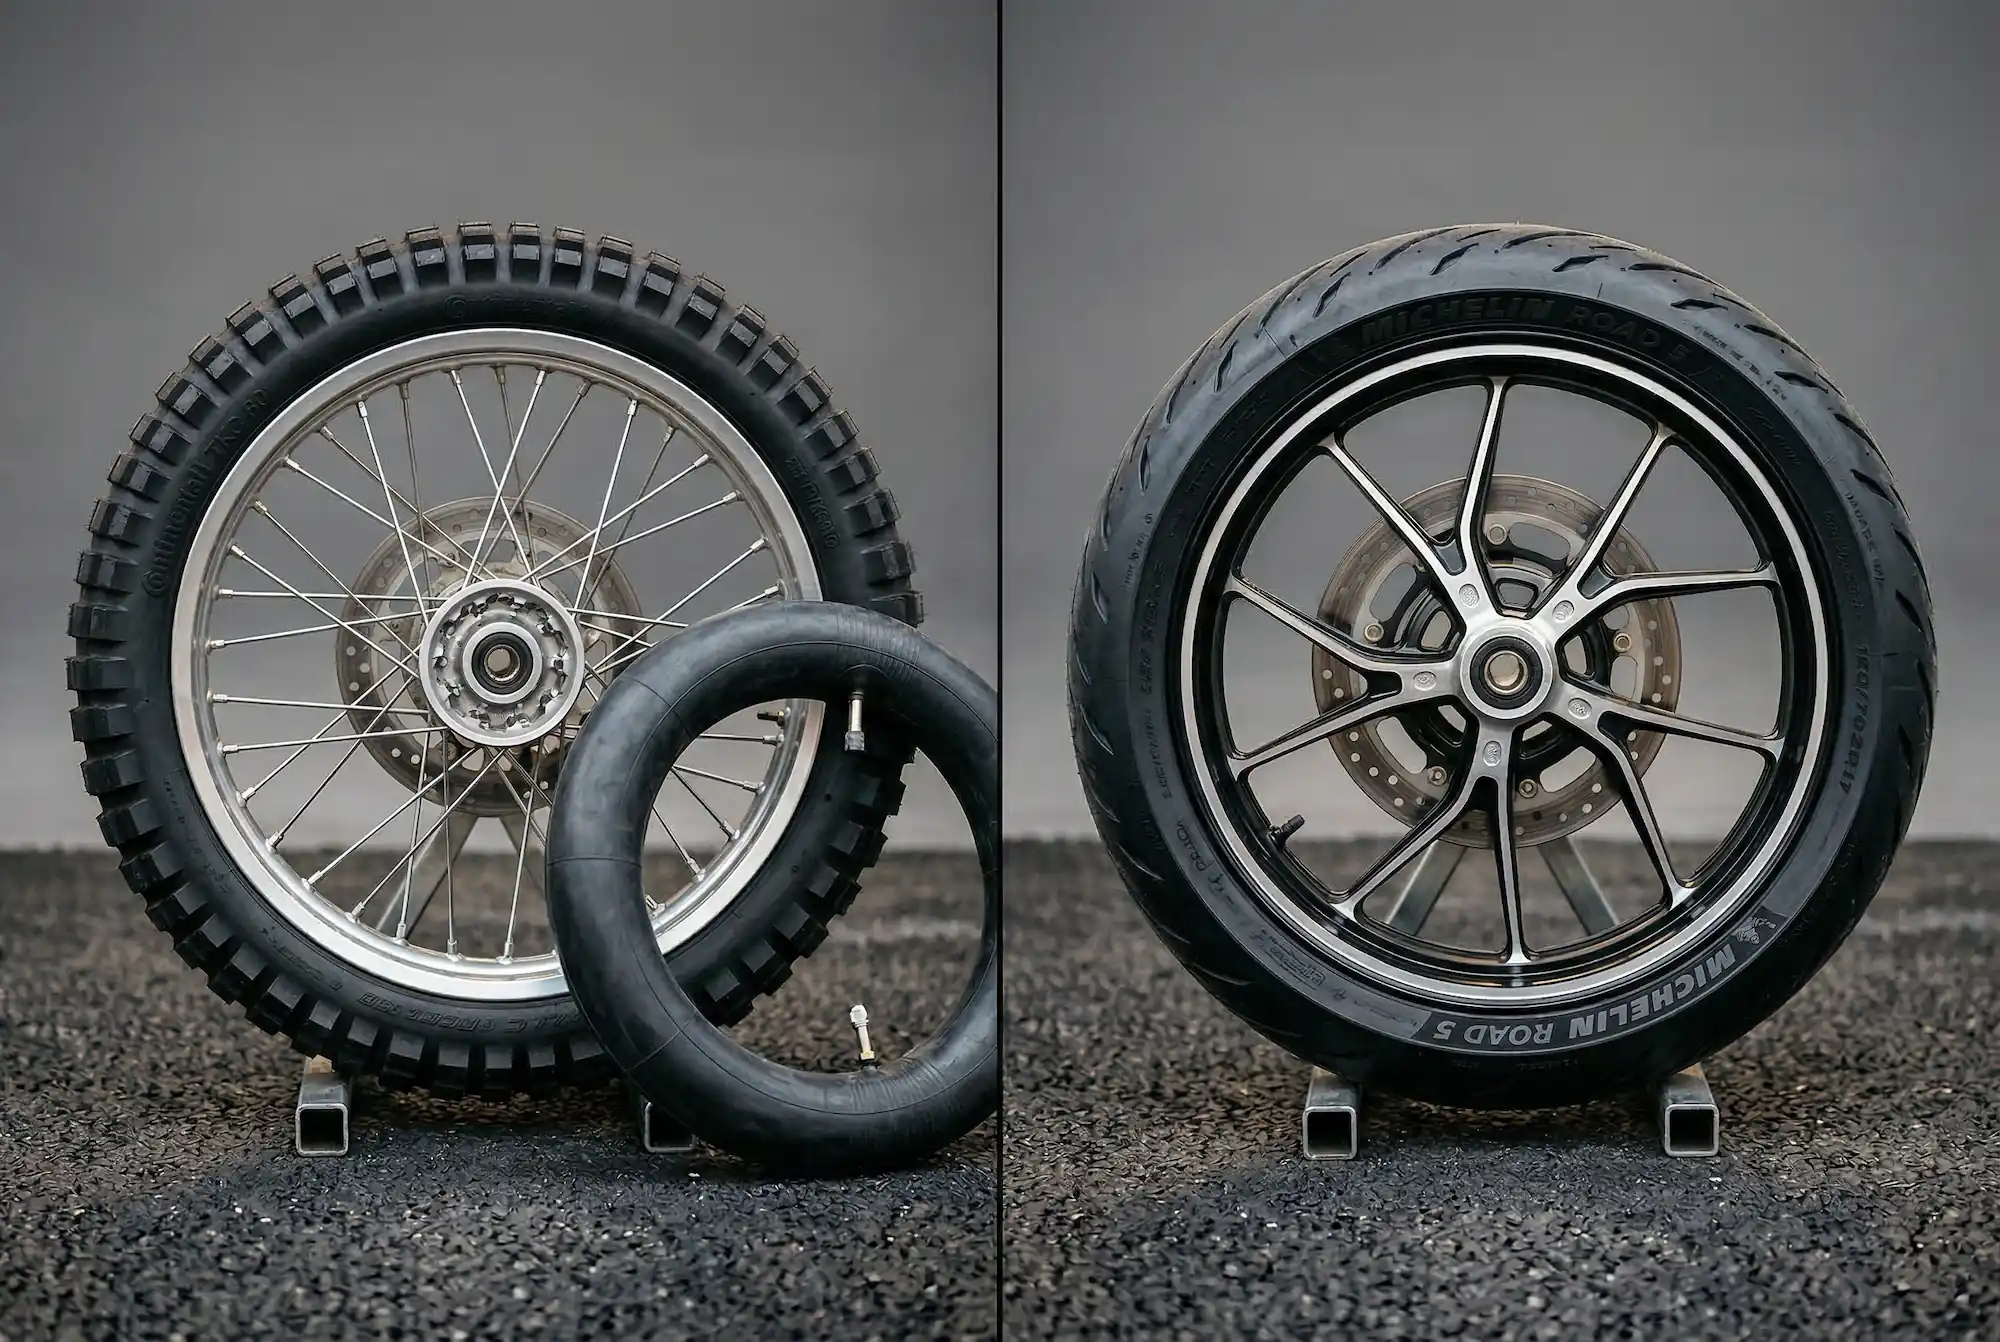
[IMAGE: Side-by-side photo — spoked wheel with tube-type tire next to a cast alloy wheel with tubeless tire, labeled clearly · alt: “tubed vs tubeless motorcycle tires comparison showing spoked and cast wheels”]

How Tubed Motorcycle Tires Work
A tubed tire is a two-component system: a tough outer tire casing plus a soft inner tube that holds all the air. The tube has its own valve stem, and when inflated, it pushes outward against the inside of the tire casing, which in turn seats against the rim. The tire itself is not airtight — it’s the tube doing all the air-holding work.
Tubes exist because of spoked wheels. Traditional wire-spoked wheels have holes drilled through the rim for the spoke nipples, making the rim impossible to seal airtight. The inner tube solves this by creating a sealed air chamber that doesn’t rely on the rim being leak-proof.
Tubed motorcycle tires are standard on dirt bikes, motocross and enduro machines, some adventure bikes, vintage and classic motorcycles, and cruisers with wire-spoked wheels. If your bike was designed before the mid-1980s, it almost certainly uses tubes. Even many modern bikes — including popular models like the Royal Enfield Continental GT 650, Triumph Bonneville, and Kawasaki KLR 650 — still use traditional spoked wheels with tubes. Note: most of these modern spoked-wheel bikes actually ship from the factory with tubeless (TL) tires fitted with inner tubes, because tube-type (TT) tires in high-performance compounds are increasingly rare. See the “Can You Put a Tube in a Tubeless Tire?” section below for why this matters.
How Tubeless Motorcycle Tires Work
A tubeless tire is a single-component system: the tire itself has an impermeable rubberized inner liner that seals directly against the rim bead. The valve stem mounts through a hole in the rim, and the entire system is airtight without needing a separate inner tube.
This requires an airtight rim — which is why tubeless tires are paired with cast alloy wheels. Cast wheels have no spoke holes penetrating the rim, so the tire-to-rim seal holds air reliably. Tubeless motorcycle tires are standard on sportbikes, touring bikes, naked bikes, modern cruisers with cast wheels, and most street motorcycles manufactured after approximately 1985.
A modern hybrid exists: tubeless-compatible spoked wheels. Some adventure bikes now use spoked wheels where the spokes attach to the outer rim flange rather than through the rim bed. This keeps the inside of the rim hole-free and air-tight. Examples include the BMW GS series, KTM Adventure models, and some Harley-Davidson touring bikes with proprietary rim-sealing technology. These wheels get the impact resistance of spokes with the tubeless convenience of a sealed rim — the best of both worlds for riders who split time between pavement and dirt.
Tubed vs Tubeless — Complete Comparison Table
Here’s the full TT vs TL tires motorcycle comparison — every practical difference between tubed and tubeless tires in one place:
| Feature | Tubed (TT) | Tubeless (TL) |
|---|---|---|
| Air held by | Inner tube | Tire itself (airtight liner) |
| Wheel type | Spoked (wire) wheels | Cast alloy wheels |
| Weight | Heavier (tube adds 300–500g per wheel) | Lighter (no tube) |
| Operating temperature | Runs hotter (friction between tube and tire) | Runs cooler |
| Puncture behavior | Rapid deflation — tube can collapse instantly | Gradual air loss — nail often stays sealed |
| Roadside repair time | 30–60 minutes (wheel removal required) | 5–10 minutes (plug kit, no wheel removal) |
| Repair tools needed | Tire levers, spare tube or patch kit, pump, axle wrenches | Plug kit, CO2 cartridge or mini pump |
| Repair cost | Tube: $8–$25. Patch: ~$2 | Plug kit: $10–$20 (reusable) |
| New tire cost | Slightly cheaper (simpler construction) | Slightly more expensive |
| Speed rating potential | Lower (heat buildup limits high-speed use) | Higher (cooler operation allows higher ratings) |
| Pinch flat risk | Yes — tube can pinch between tire and rim on impact | No — no tube to pinch |
| TPMS compatible? | Difficult (no standard valve stem location) | Yes — sensor mounts in valve stem |
| Pressure retention | Slightly worse — natural rubber tubes are microscopically more porous than the halobutyl inner liner used in TL tires. Check pressure more frequently (weekly recommended). | Better long-term pressure retention due to less permeable halobutyl inner liner |
| Best for | Off-road, vintage, spoked-wheel cruisers | Street, touring, sport, commuting |
Which Type Does Your Bike Have?
If you’re not sure whether your motorcycle uses tubed or tubeless tires, here are three quick ways to check:
1. Read the Tire Sidewall
Every motorcycle tire has “TT” (Tube Type) or “TL” (Tubeless) stamped on the sidewall. Look near the size marking — it’s usually within a few inches of the size designation. This is the most definitive answer. Important: if your bike has spoked wheels and the tire says “TL” (Tubeless), it almost certainly still has an inner tube installed — the TL marking describes the tire’s construction, not how it’s being used on your specific wheel. Many modern spoked-wheel bikes use TL tires with tubes because TT tires in modern compounds are increasingly scarce.
2. Check Your Wheel Type
Cast alloy wheels (no spokes, solid metal construction) = almost always tubeless. Wire-spoked wheels with spoke nipples visible on the inside of the rim = almost always tubed. Wire-spoked wheels with no visible nipples on the inside of the rim (spokes attach externally to the rim flange) = tubeless-compatible spoked wheels.
3. Check Your Owner’s Manual
Your manual lists the OEM tire type for both front and rear wheels. If it specifies “tube type” — you have tubes. If it says “tubeless” — you don’t. The manual also tells you the correct tire size, speed rating, and inflation pressure for each wheel.
Puncture Behavior — The Biggest Practical Difference
How a tire responds to a puncture is the single most important practical difference between tubed and tubeless motorcycle tires. It’s also the main reason tubeless tires are considered safer for street riding.
Tubed Tire Puncture
When a nail or sharp object punctures a tubed tire, the inner tube can deflate rapidly — sometimes within seconds at highway speed. The tube collapses, the tire loses all structural support, and you’re dealing with a sudden loss of control. Even a small puncture can drain the tube quickly because there’s nothing to plug the hole from inside. The object passes through the tire casing and into the tube, and the tube has no self-sealing capability. This is the primary safety disadvantage of tubed motorcycle tires.
Off-road note: For dirt bike and enduro riders operating at low pressures (8–15 PSI), the biggest risk to a tubed tire isn’t always a puncture from a nail — it’s the tire spinning on the rim under hard acceleration or braking. Without a rim lock (bead lock) installed, low tire pressure allows the rim to rotate independently inside the tire, which can rip the valve stem clean off the tube, causing instant total deflation. Always install rim locks on any off-road bike running tubes at low pressures.
Tubeless Tire Puncture
A tubeless tire’s thick rubber inner liner often captures the puncturing object. A nail at highway speed may stay lodged in the tire, and the rubber seals tightly around it, maintaining most of the air pressure. You might not even notice the puncture until your next tire pressure check. When air does escape, it leaks gradually — giving you time to pull over safely rather than dealing with an instant blowout.
⚠️ Neither type is puncture-proof. Sidewall damage, large cuts, or a massive impact will deflate any tire immediately regardless of construction type. The difference is in how the tire handles typical small punctures from nails, screws, and road debris.
Roadside Repair — Step by Step

Repairing a Tubeless Tire (5–10 Minutes)
Locate the puncture — listen for a hiss or spray soapy water on the tread to find bubbles.
Remove the nail or debris with pliers.
Ream the hole with the insertion tool from your plug kit to clean and size it.
Thread a plug strip (sometimes called a “rope” or “worm”) through the insertion needle.
Push the plug firmly into the hole, then pull the tool straight out — the plug stays seated in the tire.
Trim the excess plug material flush with the tread surface.
Reinflate with a CO2 cartridge or portable mini pump.
Ride to a tire shop for a permanent repair (internal patch) or tire replacement.
⚠️ A roadside plug is a temporary fix. Industry standard and most tire manufacturers recommend a proper internal patch-plug repair or tire replacement as soon as possible. For high-performance tires rated V, W, or Z: be aware that most tire manufacturers (including Dunlop and Michelin) state that any repaired motorcycle tire — even with a proper internal patch-plug — permanently loses its original speed rating. The forces at high speed on a motorcycle tire are extreme due to the small radius. Treat any repaired sport tire conservatively and replace it as soon as practical.
Repairing a Tubed Tire (30–60 Minutes)
Find a safe, flat surface — you need to remove the wheel entirely.
Support the bike (center stand, paddock stand, rocks, whatever works).
Loosen the axle nut and remove the wheel from the motorcycle.
Break the tire bead from the rim using tire levers or bead breaker.
Use tire levers to partially unseat one side of the tire from the rim.
Pull the inner tube out through the gap.
Locate the puncture — inflate the tube and listen, or submerge in water and look for bubbles.
Patch the tube using a vulcanizing patch kit, or replace with a spare tube.
Reinstall the tube, reseat the tire on the rim, and reinflate to the correct pressure.
Reinstall the wheel, tighten the axle, and check chain alignment (rear wheel).
This is doable roadside but requires significantly more tools, more time, and a way to elevate the bike. For long trips on a tubed-tire bike, carrying a spare tube and a compact patch kit is wise.
Can You Put a Tube in a Tubeless Tire?
Yes — and in fact, it is standard practice on many modern motorcycles. Because tire manufacturers (Michelin, Pirelli, Continental, Dunlop) now produce almost all their street and adventure tire models exclusively in tubeless (TL) construction, riders with traditional spoked wheels have no choice but to run TL tires with inner tubes. This is how bikes like the Triumph Bonneville T120, Royal Enfield Continental GT 650, Kawasaki W800, and many others leave the factory — with tubeless tires and tubes installed as permanent, everyday fitment.
It is also a valuable emergency solution for adventure riders: if a tubeless tire on a cast-alloy or tubeless-spoked wheel suffers sidewall damage that can’t be plugged, inserting a tube gets you moving again.
Important caveats:
Adding a tube creates friction and heat between the tube and the tire’s inner liner — reduce your speed rating by one step and ride conservatively. Pro Tip: Always coat the inside of the tire and the outside of the tube liberally with talcum powder (baby powder) before installation. The talc acts as a dry lubricant, preventing the raw rubber of the tube from sticking to the rough interior of the TL tire. Without talc, the tube can develop folds and chafe points that lead to punctures from internal abrasion.
The load rating is effectively reduced as well due to the additional heat buildup.
Remove the tubeless valve stem from the rim before installing the tube (the tube has its own valve).
Always use the correct tube size for your tire — or one size smaller within the compatible range. Never install an oversized tube to “fill the space.” An oversized tube will fold over on itself inside the tire, creating pinch points that will chafe through and puncture. The tube should be slightly stretched when installed, not bunched up.
For permanent installations (spoked-wheel bikes using TL tires as standard): tubes with natural rubber are slightly more porous than the halobutyl inner liner of a true tubeless setup. Check tire pressure weekly rather than monthly, as air loss will be marginally faster than on a pure tubeless system.
Some tubeless tires have stiffer beads that make breaking the seal for tube installation more difficult without a bead breaker tool.
Can You Convert Tubed Wheels to Tubeless?
This is increasingly popular among adventure riders who want the roadside repair convenience of tubeless tires on their spoked-wheel bikes. There are three main approaches:
1. Spoke Sealant Kits (Outex, Camel Seal)
These kits apply a multi-layer sealant system to the inside of the rim, covering all spoke nipple holes to create an airtight seal. The Outex kit — one of the most popular — costs approximately $70 per wheel or $130 for a front+rear set. Installation takes about 3 hours per wheel and requires precision — any gap in the sealant will leak. Critical safety note: your rim must have a safety bead — also called a bead retention hump or MT-profile rim. This is a raised lip on the inner edge of the rim that physically prevents the tire bead from sliding inward if pressure drops suddenly. Older rims with a WM-profile (no safety bead) lack this retention feature. On a WM-profile rim running tubeless without a tube, a sudden pressure drop — such as from a puncture — will instantly unseat the tire from the rim because there is nothing holding the bead in place. This is extremely dangerous and can happen mid-corner. If your rim does not have a visible hump/ridge on the bead seat area, do not attempt tubeless conversion. Outex warns that some rims without a safety bead (like the Honda Africa Twin CRF1000 front and Yamaha Ténéré 700 front) are not recommended for conversion.
2. Tubeless-Ready Rim Tape
Industrial-grade tape (such as 3M 4411N) applied over all spoke nipples to create a sealed surface. Less expensive than sealant kits at roughly $30–$60 per roll (one roll can cover 2–3 wheels), but generally considered less durable and more likely to peel at the edges over time. Some riders combine tape with a liquid sealant for added insurance.
3. Tubliss System (Dirt/Enduro)
The Nuetech Tubliss system replaces the inner tube with a two-bladder system: a small high-pressure bladder (inflated to ~100 PSI) that locks the tire bead to the rim, while the tire itself runs tubeless at low pressure. This eliminates pinch flats and allows extremely low tire pressures (as low as 4–8 PSI) for maximum off-road traction. Cost: approximately $100 per wheel (RevZilla ~$100, Rocky Mountain ATV ~$96). Primarily designed for dirt and enduro — the manufacturer does not recommend highway use.
⚠️ Conversion risks: A poorly sealed spoke nipple can leak at high speed. Manufacturers do not endorse converting wheels that weren’t designed for tubeless operation. If you convert, test thoroughly at low speed before any highway riding, and always carry a spare tube as a backup in case the seal fails.
Which Type Is Right for You? — Decision Framework
| Your Riding Style | Recommended Type | Why |
|---|---|---|
| Street commuting | Tubeless | Easy plug repair, gradual deflation = safer in traffic |
| Sport / track | Tubeless | Lighter weight, cooler operation, higher speed ratings |
| Touring / long-distance | Tubeless | Roadside plug repair is faster, TPMS compatible |
| Motocross / enduro | Tubed | Spoked wheels handle impacts better, tubes are cheap |
| ADV touring (mixed on/off) | Tubeless-compatible spoked if possible | Best of both worlds — or convert standard spoked wheels |
| Vintage / classic | Tubed | Original spoked wheels require tubes |
| Cruiser (cast wheels) | Tubeless | Standard for all modern cast-wheel cruisers |
| Cruiser (spoked wheels) | Tubed (unless rim-sealed) | Check if your model has tubeless-compatible spoked rims |

Frequently Asked Questions
Are tubeless tires safer than tubed tires?
For street riding, yes — primarily because of how they handle punctures. A tubeless tire deflates gradually, giving you time to react and pull over safely. A tubed tire can collapse instantly. For off-road riding, the question is less about the tire type and more about the wheel — spoked wheels handle rocks and impacts better than cast alloy wheels.
Can I tell if my tire is tubed or tubeless just by looking?
Check the sidewall for “TT” (Tube Type) or “TL” (Tubeless) — every tire has this marking. You can also check the wheel: cast alloy wheels with no spokes = tubeless, wire-spoked wheels with visible nipples inside the rim = tubed. Remember: many modern spoked-wheel bikes use TL-marked tires with tubes installed, so the sidewall marking alone doesn’t tell you whether a tube is present — check the valve stem type to be sure.
How much does a motorcycle inner tube cost?
Motorcycle tire tubes range from $8–$25 depending on size and brand. Heavy-duty tubes (thicker butyl rubber) run toward the higher end but resist pinch flats better. A tubeless plug kit costs $10–$20 and is reusable across multiple repairs.
Can I run a tubeless tire on a spoked wheel without a tube?
Only if the spoked wheel is specifically designed for tubeless use — meaning the spokes attach to the outer rim flange rather than through the rim bed. On a traditional spoked wheel, air will leak through the spoke nipple holes. You’d need a conversion kit (Outex, rim tape, or similar) to seal them, with the caveats and risks described above. Your rim must also have a safety bead (MT-profile with bead retention hump). Older WM-profile rims without a safety bead should never be converted to tubeless — the tire bead will unseat on sudden pressure loss.
Do tubeless tires last longer than tubed tires?
Generally yes. Tubeless tires run cooler because there’s no friction between a tube and the tire inner surface, and cooler operation extends rubber life. They also don’t suffer from pinch flats, which can damage tubes prematurely. However, tire lifespan depends more on the rubber compound, riding style, and maintaining correct inflation pressure than on TT vs TL construction alone.
Wrapping Up
The tubed vs tubeless motorcycle tires debate isn’t really a debate — it’s largely dictated by your wheel type and riding style. If your bike has cast alloy wheels (most modern street bikes), you’re already running tubeless and enjoying the benefits of easier repairs and gradual puncture deflation. If you ride off-road or own a vintage bike with spoked wheels, tubes are part of the deal. And if you’re an adventure rider who wants tubeless convenience on spoked wheels, conversion kits like Outex are a proven option — just do your homework and test carefully. Either way, carry the right repair kit for your tire type — a plug kit for tubeless, a spare tube and patch kit for tubed — and now you know exactly what that means.