
You walk into the garage, do your standard pre-ride inspection, and spot it: a thin, oily smear running down the chrome of your front suspension. Or maybe it has already progressed further — a thick, grimy crust of dried oil and road dirt forming a dark ring around the lower fork tube. This is a classic leaking fork seal situation. If you ignore it, that escaping hydraulic fluid will eventually reach your front brake rotor.
A motorcycle fork seal replacement is one of the most approachable major maintenance jobs you can tackle at home with a basic set of tools. Researched and verified against factory service manuals and technical sources, this guide covers exactly what the job entails. Tackling it yourself typically costs $75–$145 in parts. Taking the whole bike to a dealership? Expect an invoice of $280–$570. We will walk you through the progression of a leak, the exact tools required, the complete step-by-step teardown, fork oil specifications, and a real-world cost comparison.
Table of Contents
- Signs Your Motorcycle Fork Seals Are Failing
- Conventional vs. Inverted (USD) Forks
- Before You Start — The Film Trick
- Tools and Parts You Will Need
- Motorcycle Fork Seal Replacement — Step by Step
- DIY vs. Shop Cost Comparison
- How Often Should You Change Fork Seals?
- Frequently Asked Questions
Signs Your Motorcycle Fork Seals Are Failing
The motorcycle fork oil seal is a precision rubber ring designed to keep pressurized hydraulic fluid inside your suspension while keeping the abrasive outside world out. Just above it sits the dust seal, which acts as the first line of defense against road debris. When these components fail, they typically degrade through identifiable stages. Catching the issue early saves you from dangerous collateral damage.
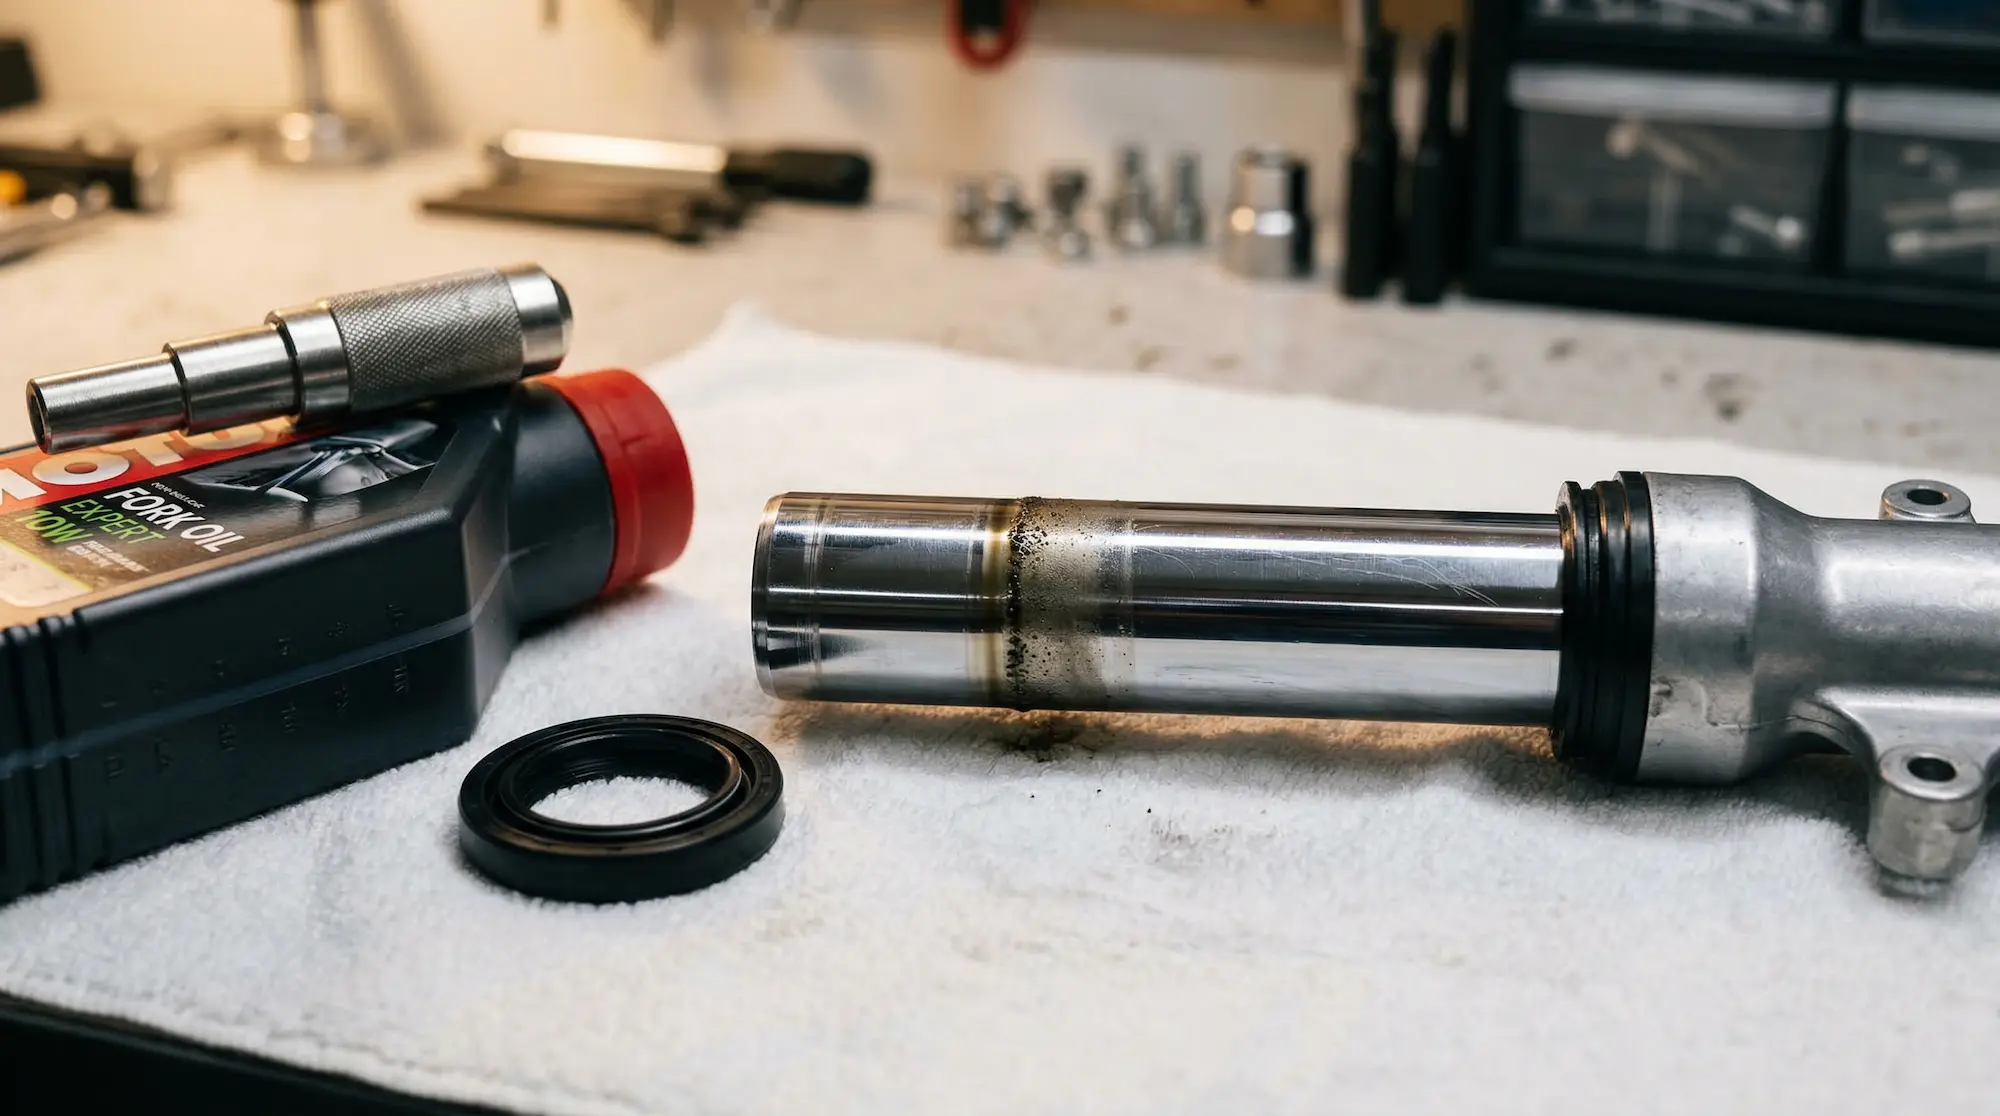
Stage 1: Oily film on the slider (Initial Warning)
You will notice a wet sheen or a light ring of oil just above the dust seal on the chrome tube. At this early stage the effect on damping is minimal, but the oil level is already dropping — which will progressively increase the air gap above the oil column and soften the fork’s progression near full compression as the leak continues. Do not dismiss a Stage 1 leak as harmless.
Stage 2: Dirt crust formation
As the seeping oil travels down the fork tube it catches airborne road dust, sand, and brake dust. This mixture dries into a nasty brown or black crust around the slider. The leak is now active and the oil seal has physically failed.
Stage 3: Oil inside the front fender
Wind turbulence at highway speeds catches the leaking oil and blows it backward, coating the inside of your front fender and sometimes spotting the radiator. Fork oil level is dropping rapidly at this point.
Stage 4: Oil on the brake rotor or pads (Critical Hazard)
The oil has traveled all the way down the fork leg and dripped onto your brake caliper. Oil contamination causes severe, immediate degradation of brake pad friction — the porous friction material absorbs the oil and cannot be cleaned out with brake cleaner alone. Contaminated pads must be thrown away and replaced entirely. The steel brake rotor itself can be saved but must be aggressively scrubbed with brake cleaner and a Scotch-Brite pad. For a complete guide to restoring full brake system integrity after this stage, see our article on how to bleed motorcycle brakes.
Stage 5: Spongy or diving suspension
The fork has lost so much fluid that the internal damping cartridge is pulling in air instead of oil. The front end will dive violently under hard braking, feel spongy, and rebound with a harsh “clunk.”
⚠️ Safety rule: If you see fork oil on the brake rotor or the front brake lever feels soft or spongy, stop riding immediately. Brake pads contaminated with fork oil must be replaced along with the seals before the bike returns to the road.
Conventional vs. Inverted (USD) Forks — Does It Change the Job?
Before ordering parts, identify your suspension architecture. The basic physics of how to replace motorcycle fork seals remain the same, but the orientation affects how fast the oil leaks and how the fork physically comes apart.
| Type | Description | Examples | Key Difference |
|---|---|---|---|
| Conventional | Inner tube (stanchion) on top, clamped to triple tree. Outer slider on the bottom. | Most mid-range street bikes, cruisers, older standards. | Oil reservoir sits below the seal. Leaks develop slower as oil only reaches the seal under compression. |
| Inverted (USD) | Outer slider on top. Inner stanchion on the bottom, attached to the axle. | Sport bikes, premium naked bikes, modern ADVs. | Oil reservoir sits above the seal. Gravity forces oil against the seal constantly, meaning leaks are faster once initiated and more likely to reach the brakes quickly. |
For USD forks, the disassembly sequence is slightly different and often requires compressing a heavy spacer to access a hidden locknut under the top cap. Always consult the specific service manual for your exact model before starting.
Before You Start — The Film Trick (Try This First)
Worth attempting before committing to a full teardown — takes 10 minutes and costs nothing. It works only when a small piece of debris (like a grain of sand) is trapped between the seal lip and the chrome stanchion, holding the rubber slightly open. It does not work on worn, cracked, or physically damaged seals.
- Carefully pry the outer dust seal down using a flat plastic pry tool. Do not use metal — you will scratch the chrome.
- Cut a piece of 35mm photographic film, or cut a hook-shaped strip from a thin, pliable plastic milk jug.
- Slide the thin plastic up between the rubber oil seal and the chrome stanchion.
- Rotate the plastic all the way around the perimeter of the tube, pulling slightly downward to drag out any trapped debris.
- Wipe the tube completely clean, push the dust seal back into place, and pump the forks several times.
If the leak stops, clean your brake rotors and monitor for the next 100 miles. If it continues weeping, the seal is permanently compromised and requires full replacement.
Tools and Parts You Will Need
Tools
| Tool | Necessity | Approx. Price |
|---|---|---|
| Front wheel stand / paddock stand | Essential | $40–$80 |
| Axle socket (size varies by bike) | Essential | Included in basic kits |
| Allen key for bottom slider bolt (usually 6mm) | Essential | $5–$10 |
| Fork seal driver | Highly Recommended | $20–$50 |
| Fork oil level syringe with tube | Recommended | $15–$25 |
| Oil catch container | Essential | $5–$15 |
| Lint-free rags and brake cleaner / solvent | Essential | $5–$10 |
| Model-specific service manual | Essential (torque specs & oil level) | $20–$40 (Haynes) or free online |
| Total (first time buying tools) | $110–$230 | |
| Total (if you already own basic tools) | $0–$30 |
If you prefer not to buy a dedicated metal fork seal driver, a piece of PVC pipe cut to a diameter slightly smaller than the inside of the slider works perfectly to press the seal into position. Never strike a screwdriver directly against the seal — you will permanently damage the delicate rubber lip.
Parts
| Part | OEM Price (Approx.) | Quality Aftermarket Price |
|---|---|---|
| Oil seals (x2, one pair) | $40–$80 | $15–$30 (Athena, ProX, All Balls) |
| Dust seals (x2, one pair) | $15–$30 | $8–$15 |
| Fork oil (correct viscosity per service manual) | $15–$25 / liter | $10–$18 / liter |
| Damper rod bottom bolt crush washers (x2) | $3–$8 | $1–$5 |
| Total Parts Cost | $75–$145 | $35–$70 |
ProX and All Balls Racing manufacture seals through the same Japanese OEM suppliers at a lower retail price. Athena is a reliable Italian alternative. Avoid no-name seals from unknown sources — a low-quality seal will typically fail within 5,000–10,000 miles.
Always replace both fork seals at the same time, even if only one is leaking. The other seal has the same age, mileage, and compression wear — it will fail shortly after. Dismantling your entire front end twice in two months is not worth the cost of one extra seal set.
Motorcycle Fork Seal Replacement — Step by Step
This procedure covers conventional forks on a standard street motorcycle, which is the most common configuration. For USD forks with closed-cartridge systems (such as Öhlins or WP units on premium sport bikes), the internal bleeding and spring-compression sequences differ. Always consult the service manual for your specific model first. Expect 3–5 hours the first time.
Step 1 — Prepare the Workspace and Secure the Bike
Work on a clean, dry surface. Fork internals operate with tight tolerances, and any grit that enters during reassembly will destroy the new seals immediately. Use a steering-stem paddock stand or a secure center jack to lift the front end until the wheel clears the ground. Lay out all tools before starting — you do not want to search for an Allen key with fork oil on your hands.
Step 2 — Remove the Brake Caliper and Front Wheel
Unbolt the front brake caliper (or both on dual-disc bikes) and hang it from the frame with a bungee cord or wire hook. Do not let it hang by the brake line — the weight can damage the internal crimps. Loosen the axle pinch bolts, remove the main axle nut, and slide the front wheel out. If your front fender mounts directly to the fork legs, remove it now. For context on the tire and wheel components you are working around, our guide on tubed vs. tubeless motorcycle tires explains the differences in wheel construction that affect this step.
Step 3 — Loosen the Fork Caps and Remove the Fork Legs
Loosen the top fork caps while the tubes are still clamped in the lower triple tree — the triple tree acts as a vise to hold the tube steady against the torque of the cap. Crack them loose with a socket but do not unscrew them completely yet. Once loose, loosen the upper and lower triple tree pinch bolts and carefully slide the fork legs downward to extract them from the bike.
Step 4 — Drain the Old Fork Oil
Hold the fork tube vertical over your oil catch container. Apply downward pressure to the top cap (it is under spring tension) and unscrew it fully. Pull the spring out. Invert the tube and let the old oil drain completely. Pump the inner stanchion up and down several times to expel residual oil trapped inside the damping rod.
Next, use an Allen key to loosen the bolt at the very bottom of the slider (the damper rod bolt). The internal damper rod often rotates with the bolt — you may need to insert a long holding tool down from the top to counter the rotation, or temporarily reinstall the spring and cap to apply downward pressure on the rod. Wipe all components clean with lint-free rags and solvent.
Step 5 — Separate the Stanchion from the Slider and Remove the Seals
With the bottom damper bolt removed, the stanchion and slider are ready to separate. Use a plastic-wrapped flathead screwdriver to carefully pry the outer dust seal up and out of the slider without scratching the metal. Directly underneath, use a pick to remove the metal circlip (retaining ring) that locks the oil seal in place. Note its orientation before removing.
Firmly grasp the outer slider in one hand and the inner chrome stanchion in the other. Use a vigorous “slide-hammer” pulling motion to yank the stanchion forcefully out of the slider. The internal metal bushings will slam against the old oil seal from the inside, driving it out. It typically takes three or four hard yanks. Slide the old seal, washer, and bushings off the stanchion.
Critical inspection: Examine the entire chrome surface of the stanchion for pitting, rust spots, or vertical scoring. A damaged stanchion will destroy a new seal within a few thousand miles. If damage extends beyond very minor surface imperfections, the stanchion needs to be re-chromed or replaced before proceeding.
Step 6 — Clean, Inspect, and Install New Seals
Thoroughly clean the inside of the aluminum slider and the chrome stanchion with solvent and a lint-free cloth. Reinstall the internal damper rod into the stanchion, slide it back into the outer slider, and secure with the bottom Allen bolt. Always use a brand-new copper or aluminum crush washer on this bolt and torque to the service manual specification.
To protect the inner lip of the new oil seal, wrap the top edge of the chrome stanchion in electrical tape or a thin plastic bag. Lubricate the new seal’s lip heavily with clean fork oil. Slide the seal down the tube.
Orientation: For most conventional fork seals, the side with the visible garter spring and the deeper cavity faces downward toward the oil. However, always verify orientation against your service manual or the markings stamped on the seal itself — many seals carry a “TOP” or directional indicator. Installing a seal reversed will cause an immediate, catastrophic leak on first use. Some USD and closed-cartridge designs use seals with different orientation requirements.
Use your fork seal driver (or PVC pipe) to press the seal evenly into its seat until you hear a solid “thud” and can clearly see the machined groove for the circlip. Snap the circlip securely into the groove, then press the new dust seal into the top of the slider.
Step 7 — Fill with Fork Oil to the Correct Level
Consult your service manual for two specific values: (1) the required oil viscosity in cSt at 40°C per ASTM D445, and (2) the exact oil level height in millimeters from the top of the tube with the fork fully compressed and the spring removed. Always use the cSt value from the manual, not just the “weight” label (5W, 10W, 15W) — weight labels are not standardized across brands, and two “10W” oils from different manufacturers can differ meaningfully in actual viscosity at operating temperature.
Pour fresh oil into the tube, stopping slightly above the specified level. Bleed the cartridge by slowly pumping the inner stanchion and damping rod up and down 10–15 times until you feel smooth, consistent hydraulic resistance and no more air bubbles rise from the oil. If you measure the level before bleeding, trapped air will escape during the first ride, the fluid level will drop, and the suspension will lose rebound damping.
Once bled, fully compress the fork and use your oil level syringe to extract the excess until the level matches the exact millimeter height from the manual. The air gap above the oil acts as a secondary pneumatic spring — too much oil makes the fork harshly rigid at full compression, while too little makes it dangerously spongy.
Step 8 — Reassemble and Torque to Specification
Reinstall the main spring, washers, and spacers in the correct order as shown in your service manual. Thread the top fork cap back in. Reinsert the completed fork legs into the triple tree, ensuring both protrude at exactly the same height above the top triple clamp (use a ruler or tape mark).
Tightening sequence matters: first torque the lower triple clamp pinch bolts to hold the tubes. Second, fully torque the top fork caps. Third, torque the upper triple clamp pinch bolts. Reinstall the front fender, wheel, and axle nut to spec. Reinstall the brake calipers and pump the front brake lever repeatedly until firm pressure returns — the pistons were pushed back during removal.
Step 9 — Test Before Riding
With the bike off the stand, compress the forks vigorously by hand while holding the front brake. Check both new dust seals for any weeping. Verify the front axle has no lateral play. Take the bike to a quiet area and test the front brakes progressively at low speed before returning to traffic.
Motorcycle Fork Seal Replacement Cost — DIY vs. Shop
The motorcycle fork seal replacement cost is heavily weighted toward labor — most of what a shop charges is for dismantling and reassembling the motorcycle front end, not the seal swap itself.
| Option | Parts Cost | Labor Cost | Estimated Total | Time |
|---|---|---|---|---|
| DIY (first time) | $75–$145 | $0 | $75–$145 | 4–6 hours |
| DIY (experienced) | $35–$70 | $0 | $35–$70 | 2–3 hours |
| Independent Shop (forks only drop-off) | $75–$145 | $80–$150 | $155–$295 | — |
| Independent Shop (full bike drop-off) | $75–$145 | $150–$300 | $225–$445 | — |
| Dealership (full service) | $80–$170 | $200–$400 | $280–$570 | — |
Most shop labor is billed for removing and reinstalling the fork legs from the chassis — the seal swap itself takes an experienced mechanic under an hour at the bench. If you pull the forks yourself and carry them in, you can realistically save $100–$200 in labor at most independent shops. For a broader picture of what motorcycle maintenance jobs cost and which are worth doing yourself, see our motorcycle tune-up cost guide.
How Often Should You Change Fork Seals?
On a standard street bike ridden on clean pavement, fork seals typically last 20,000–40,000 miles. However, the fork oil itself should be replaced every 2 years or 15,000 miles regardless of whether the seals are leaking. As oil degrades it loses viscosity and fails to lubricate the seal lips properly, accelerating rubber wear from the inside out — a leading cause of seal failure well before the expected mileage window. This interval is one of the most commonly skipped items on a motorcycle maintenance schedule, as covered in our guide on how long motorcycles last and what maintenance habits most directly extend service life.
For ADV and dirt riders the interval is much shorter, as abrasive dust and mud attack suspension seals aggressively. A clear sign that fork oil needs changing even without a visible leak is if the drained oil comes out pitch black rather than dark amber-brown, or if the front end feels less progressive or excessively bouncy. Fork seal condition is also a key inspection item during winter storage prep — our motorcycle winterization guide covers exactly what to check before putting the bike away for the season.
Frequently Asked Questions
How much does motorcycle fork seal replacement cost?
In a DIY setting, expect to spend $75–$145 on parts (seals, fork oil, crush washers), plus $110–$230 on tools if this is your first time. At an independent shop the total runs $155–$445 depending on whether you drop off the entire motorcycle or just carry in the pre-removed fork tubes. Dealerships charge premium labor rates, pushing the total to $280–$570. The biggest cost lever if you use a shop is dismantling the front end yourself to eliminate two hours of billed labor.
Can I ride with a leaking fork seal?
It depends on severity. A minor weeping leak (small oily film on the slider) allows cautious short-distance riding, but every mile forces more oil toward your brake rotor. If you see oil physically dripping onto the brake disc, or if the front brake lever feels spongy, stop immediately. Oil contamination causes severe, immediate degradation of brake pad friction capacity — contaminated pads must be replaced entirely, not just cleaned. Once braking is restored, bleed the system per our brake bleeding guide to confirm full hydraulic integrity.
How long does fork seal replacement take?
Allocate 4–6 hours for a first-time attempt. For someone who has done the job before with tools ready, 2–3 hours is realistic. An experienced shop mechanic completes the bench work in 1–2 hours. Time increases significantly if the lower damper rod bolts are seized or the inner tubes require polishing to remove surface burrs before new seals will seat correctly.
Should I replace both fork seals at once?
Yes, always. Even if only one fork is actively leaking, the other seal has endured the same age, mileage, and compression wear — it will fail shortly after. The cost of a second set of seals is negligible compared to the time and effort of dismantling the entire front end a second time within weeks.
What fork oil should I use after replacing the seals?
Use the exact viscosity specified in your service manual, expressed in cSt at 40°C per ASTM D445. Do not rely solely on the “weight” label (5W, 10W, 15W) — these designations are not standardized across manufacturers, meaning two products labeled “10W” can differ in actual cSt value at operating temperature. A higher viscosity provides more resistance and a firmer ride; too low a viscosity produces a bouncy, uncontrolled front end. Always use the cSt spec from your model’s manual, not a generic recommendation.
A failing fork seal is not an immediate roadside emergency in its early stages, but it becomes a serious safety hazard if ignored until hydraulic fluid coats the front brake rotor. With the correct tools, a clean workspace, and your factory service manual, this is a highly approachable task for any rider with moderate mechanical inclination — saving $200–$400 in shop labor. If your chrome stanchions are heavily gouged, or you ride a bike with complex closed-cartridge forks, handing the tubes to a suspension specialist is the right call. Once the job is done, restore your brake system to full confidence with our guide on how to bleed motorcycle brakes.