
Picture this scenario: you park your bike in November and throw a tarp over it. Spring rolls around, you gear up, hit the starter button — and get a dead click, flat-spotted tires, and a carburetor gummed up solid with green varnish. Do not be that rider.
Properly winterizing a motorcycle takes about two to three hours and costs roughly $30–$60 in supplies. Every single step you skip right now translates directly into a real, expensive repair bill in the spring. If you want to know how to winterize a motorcycle correctly, you need to follow a strict mechanical process — and the details matter. What saves a carbureted bike will ruin a fuel-injected one.
This guide covers the 10 essential steps to correctly store your bike for the off-season, with specific callouts for carbureted vs. fuel-injected differences throughout. Grab your tools, clear off the workbench, and let’s put your motorcycle to bed the right way.
Table of Contents
- What You’ll Need Before You Start
- Step 1 — Add Fuel Stabilizer and Run the Engine
- Step 2 — Change the Oil Before Storage
- Step 3 — Remove and Maintain the Battery
- Step 4 — Fog the Engine
- Step 5 — Clean and Lubricate the Chain
- Step 6 — Protect the Tires
- Step 7 — Apply Corrosion Protection
- Step 8 — Plug Exhaust and Air Intake
- Step 9 — Final Wash and Inspection
- Step 10 — Cover and Choose Your Storage Location
- Winterizing Checklist (Quick Reference)
- Frequently Asked Questions
What You’ll Need Before You Start
This is a gather-first job. Do not start draining fluids or pulling parts until you have everything ready. Stopping midway to drive to the auto parts store is exactly how steps get skipped and mistakes get made.
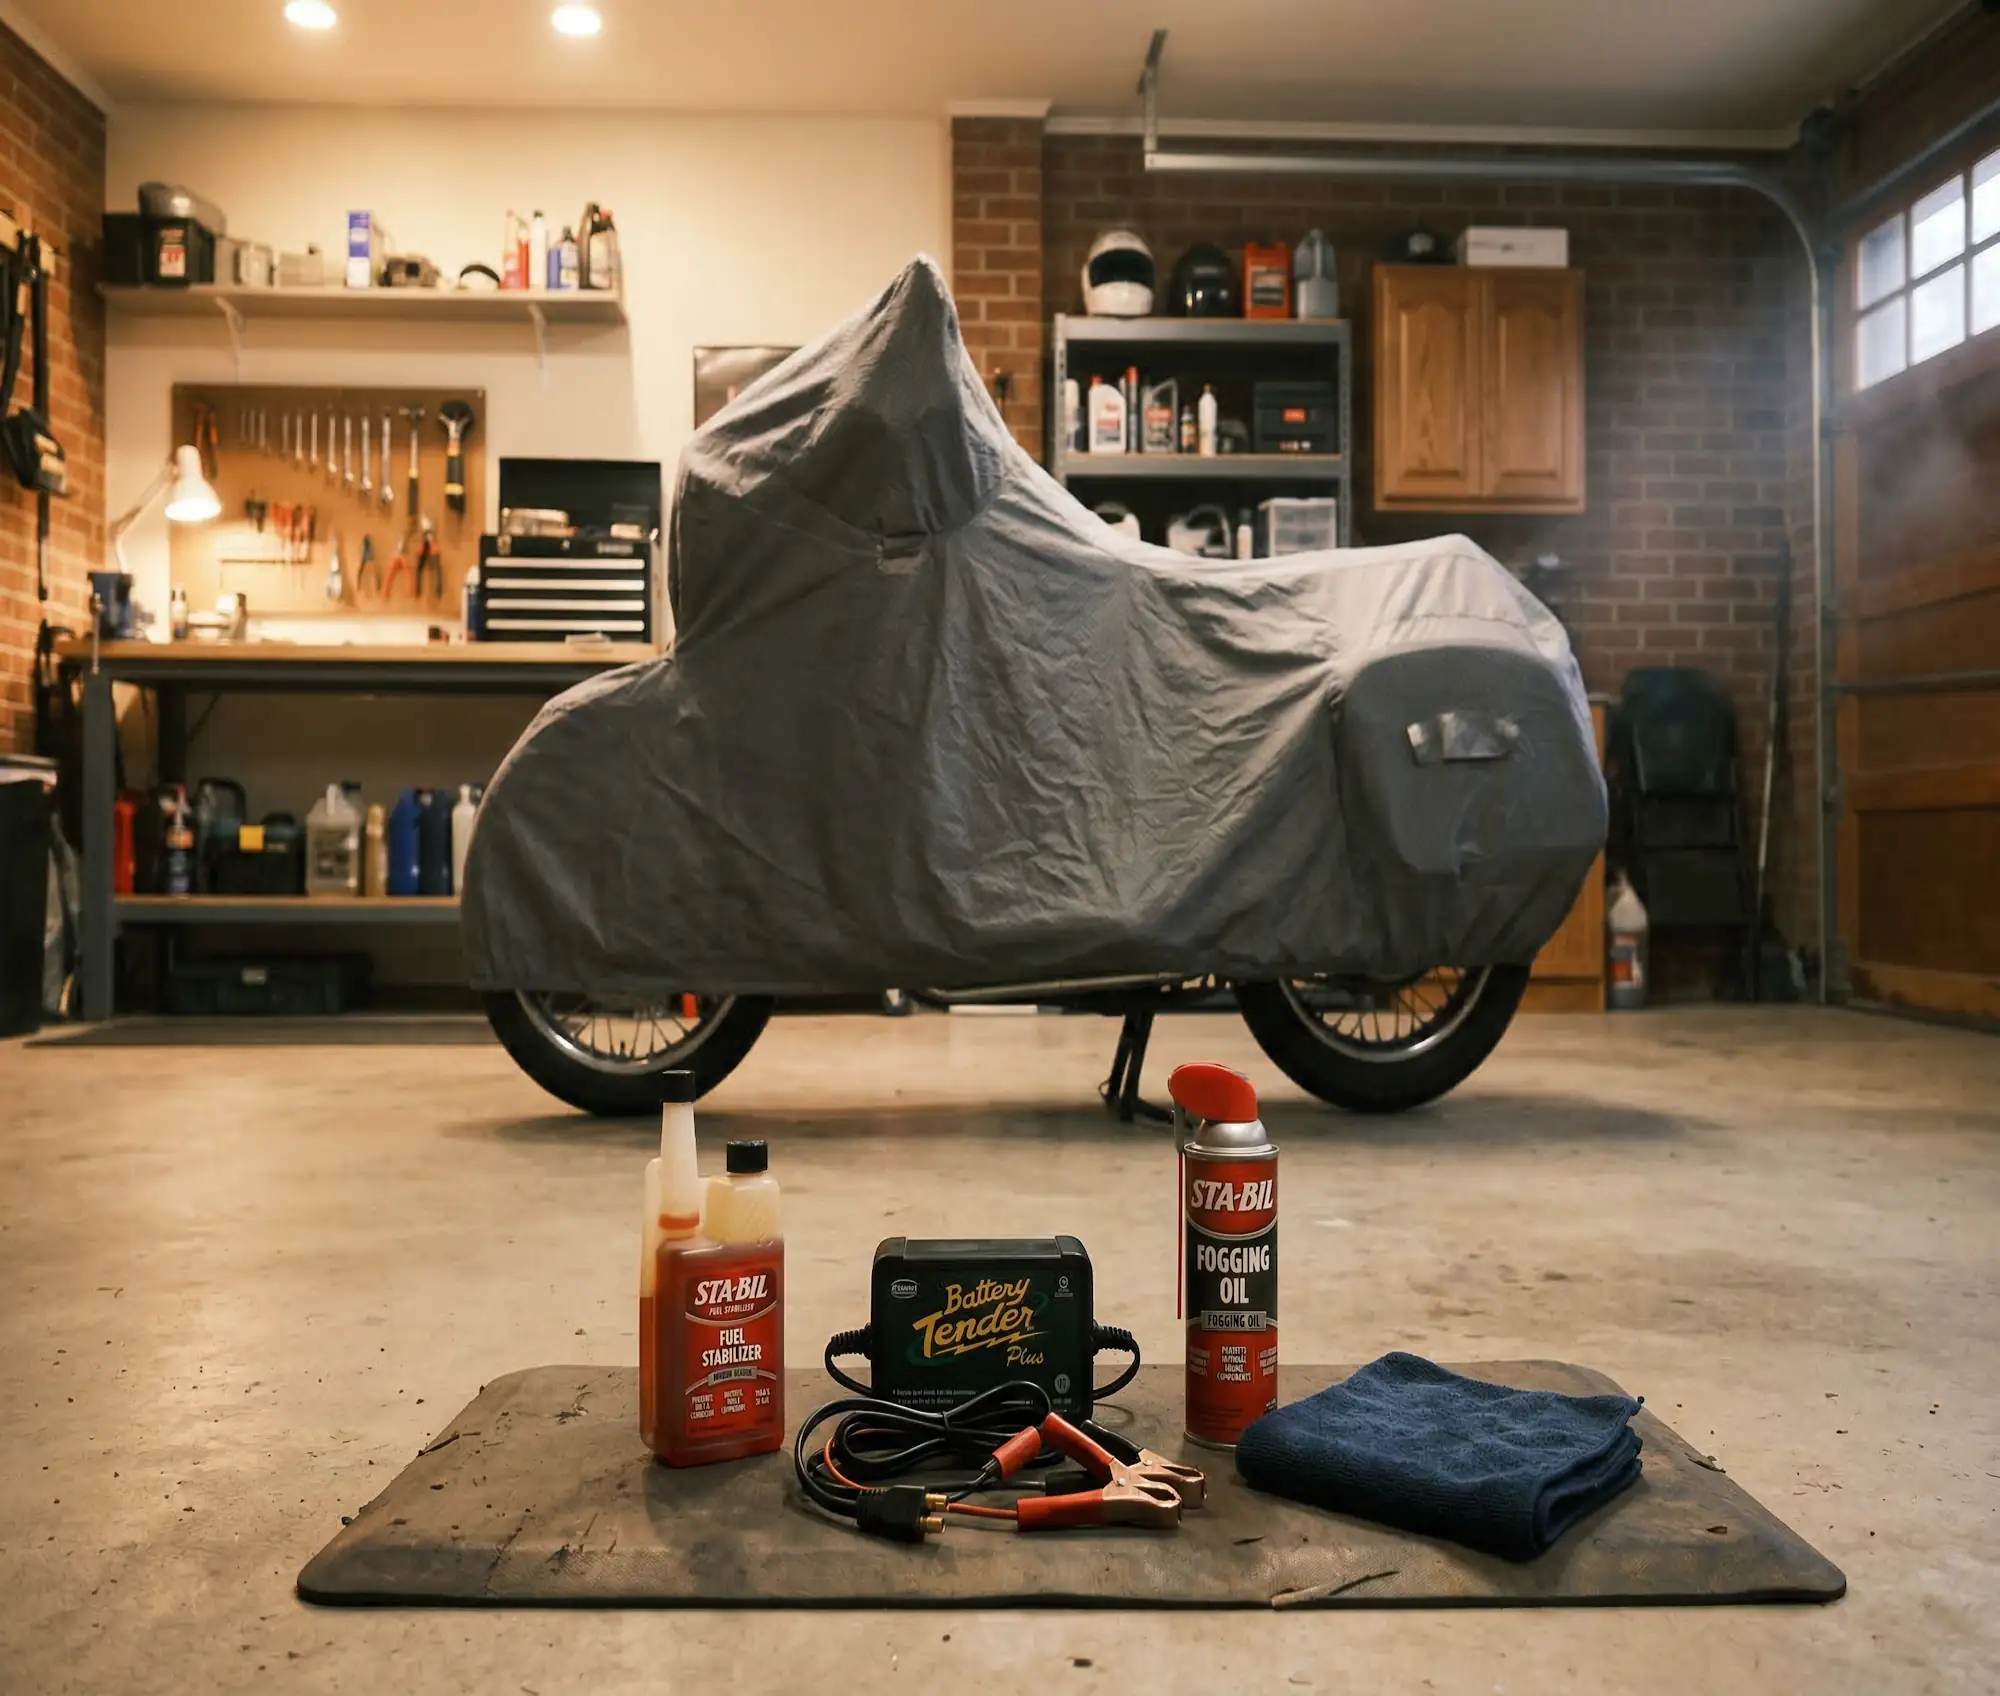
Here is your complete motorcycle winter storage supply list. Total DIY cost typically runs $50–$80 if you do not already own these items.
| Item | Purpose | Approx. Cost |
|---|---|---|
| Fuel stabilizer (Sta-Bil 360 or Seafoam) | Prevents fuel degradation and varnish buildup in the fuel system | $9–$12 |
| Engine oil + filter | Fresh oil prevents internal corrosion from acidic combustion byproducts during storage | $20–$40 |
| Smart battery tender (Battery Tender Junior, NOCO Genius) | Maintains correct cell voltage during storage without overcharging | $25–$35 |
| ACF-50 or WD-40 (classic) | Corrosion protection on exposed metal surfaces, frame welds, and exhaust | $12–$18 |
| Motorcycle cover (breathable fabric) | Dust and moisture protection — breathable only, never plastic | $30–$60 |
| Chain lube (O-ring safe) | Pre-storage heavy coating to protect chain rollers and O-rings from rust | $8–$12 |
| Tire pressure gauge | Verify correct PSI before dropping the bike to its storage position | $5–$15 |
| Fogging oil (WD-40 Specialist or Seafoam Spray) | Coats cylinder walls to prevent oxidation during long-term storage | $8–$12 |

Step 1 — Add Fuel Stabilizer and Run the Engine
Modern untreated gasoline starts degrading in as little as 30 days. Ethanol-blend fuel (E10 or E15) — the standard at most US pumps — actively attracts moisture from the air through a process called phase separation. The water and ethanol sink to the bottom of your tank, rusting bare metal internally and leaving a sticky, rock-hard varnish throughout your fuel system that clogs jets, injectors, and fuel pumps.
Add a high-quality fuel stabilizer to a full or near-full tank right before your final ride. For Sta-Bil 360, use exactly 1 oz per gallon. For Seafoam, the minimum is 1 oz per gallon — you can safely go up to 1.5 oz per gallon. Add the stabilizer before filling up so it blends thoroughly during fueling.
Run the engine for 10–15 minutes to ensure the treated fuel fully circulates through the fuel pump, lines, and injectors. Then top the tank to the absolute brim to minimize the internal air gap where condensation forms.
Carbureted bikes — one critical extra step
After running the engine with stabilizer, turn the petcock valve to the OFF position. Let the engine idle until it starves of fuel and stalls out completely. This purges the carburetor float bowls of fuel entirely. Stale fuel evaporating inside carb bowls is the single most common reason older bikes refuse to start in spring. If you skip this step, budget time in spring for a full carburetor strip and clean — our complete guide to cleaning a motorcycle carburetor covers the full process.
Ethanol damage also causes internal tank rust over time. If you are reviving a bike that was stored without stabilizer and suspect internal corrosion, our rusty motorcycle gas tank cleaning guide is your starting point before any other work.
Skip the float bowl drain on fuel-injected bikes. FI systems do not have float bowls and rely on residual fuel in the lines to keep tiny injector O-rings from drying out and cracking during storage.
Step 2 — Change the Oil Before Storage (Not After)
This is the most common, damaging mistake riders make: thinking they will change the oil in spring so it feels “fresh” for the new season. This is mechanically backwards. Used engine oil contains highly acidic combustion byproducts, blow-by carbon particles, and dissolved moisture. Leave dirty oil sitting in the sump for five months and those acids actively etch and corrode your engine bearings, transmission gears, and clutch plates all winter long.
Change the oil now so clean, acid-free fluid protects your engine throughout storage. Use your manufacturer-specified viscosity and type. Reinstall the drain plug with a fresh crush washer, spin on a new filter, fill to spec, and run the engine briefly to circulate fresh oil to every gallery and bearing surface. Do not skip the post-fill run — your camshafts and upper cylinder walls will otherwise sit bone-dry all winter.
Step 3 — Remove and Maintain the Battery
A dead battery is the fastest way to ruin your first spring ride. You have two viable options depending on your storage setup.
Option A (recommended): Remove the battery. Disconnect the negative cable first, then the positive. Store the battery indoors at stable room temperature. Connect it to a smart battery tender — Battery Tender Junior, NOCO Genius, or Oxford Oximiser all work correctly. Smart chargers actively monitor charge state and automatically pulse a maintenance charge without overcharging. Old-style unregulated trickle chargers will boil a battery dry over several months. Clean terminal posts with baking soda solution, dry completely, and apply a thin layer of dielectric grease to prevent corrosion.
Option B: Leave on the bike. Connect a smart tender via an SAE pigtail routed securely outside the fairing. Only acceptable if your garage consistently stays above freezing.
Critical temperature rules by battery chemistry
Lead-acid AGM: A fully discharged lead-acid battery has electrolyte close to pure water composition and will freeze near 0°C / 32°F, cracking the case. A fully charged lead-acid battery freezes at approximately −68°C / −90°F — cold storage is not the concern; charge state is. Keep it charged and it will survive any typical garage winter.
LiFePO4 (lithium): These batteries must never be charged below 0°C / 32°F. Charging at or below freezing causes irreversible lithium plating on the anode, permanently destroying cell capacity — even with a smart tender. This is a hard electrochemical limit specified by every major manufacturer (Shorai, Antigravity, Ballistic). LiFePO4 batteries can safely discharge at lower temperatures, but if your smart tender will be running in an unheated garage that drops below freezing, you must bring the battery indoors. A completely dead LiFePO4 cell can also suffer permanent damage from full depletion — maintain charge above 20% at all times.
Not sure whether your charging system is even healthy enough to have kept the battery properly topped up during the season? Our guide on what a motorcycle stator does explains how the charging system works and how to identify failure before it destroys a battery.
Step 4 — Fog the Engine (Recommended for 3+ Month Storage)
Fogging oil is a light petroleum spray that coats bare cylinder walls and valve stems, preventing flash oxidation and surface rust during long-term storage. If your bike will sit untouched for more than three months, this is extremely cheap engine insurance.
Remove your spark plug(s) carefully and set them aside. Spray 2–3 seconds of fogging oil directly down into each spark plug hole so it coats the combustion chamber walls and piston crown.
To distribute the oil: put the bike in top gear and slowly rotate the rear wheel by hand two or three full revolutions. This is the correct distribution method for all bike types. Do not tap the starter button — on fuel-injected bikes, the ECU activates the injectors during any crank event regardless of whether the plugs are installed, spraying raw fuel directly onto the fresh fogging oil coating and completely defeating the purpose of the step. On carbureted bikes, hand rotation is equally effective and less invasive. Reinstall the spark plugs to the torque specification in your owner’s manual.
Step 5 — Clean and Lubricate the Chain
Road grit, trapped moisture, and corrosive brake dust left on your chain all winter will accelerate metal wear and destroy the O-rings or X-rings that seal internal lubrication. Never park a dirty chain for the off-season.
Clean the chain thoroughly with a dedicated motorcycle chain cleaner or kerosene applied with a chain cleaning brush. Note on WD-40: the classic WD-40 formula is a water displacer, not a chain lubricant, and should not be used as one — however, WD-40 Specialist Chain Cleaner is a legitimate purpose-built motorcycle chain cleaning product. Do not confuse the two. Scrub the chain clean, dry it completely with shop rags, then apply a heavy, liberal coat of quality O-ring-safe chain wax or lube. This thick layer acts as a physical moisture barrier against damp garage air throughout the winter.
Storage is also the ideal time to check your chain’s overall condition. Our complete motorcycle chain cleaning and lubing guide covers every technique in detail, and if the chain has any slack, our chain tension adjustment guide walks you through the exact procedure before you close up the garage for winter.
Step 6 — Protect the Tires
Motorcycle tires suffer in two specific ways during winter storage: pressure loss from cold temperatures, and flat-spotting from static weight on a single contact patch.
Correct inflation for storage: Inflate both tires to the high end of the range specified in your owner’s manual — never above the maximum PSI stamped on the tire sidewall. Cold temperatures naturally reduce pressure approximately 1 PSI for every 10°F drop in ambient temperature, so starting at the high end of the manual range compensates correctly. Exceeding the sidewall maximum pressure creates structural risk, especially on aged or cold rubber.
Not sure what the numbers on your tire sidewall mean? Our motorcycle tire sizes explained guide breaks down every number and rating stamped on the sidewall.
Get the bike off its wheels: Use a center stand, rear paddock stand, or front/rear stand combo. Lifting weight off the rubber entirely eliminates flat-spotting risk for tires stored three or more months. If you do not own stands, roll the bike forward one foot every two to three weeks to rotate the contact patch. Keep tires off bare concrete — place plywood or a carpet offcut under the wheels. Concrete wicks moisture and accelerates rubber compound degradation over time.
If you are also evaluating whether to switch tire types for next season, our tubed vs. tubeless motorcycle tire guide covers the key differences and which setup suits different riding styles.
Step 7 — Apply Corrosion Protection
Winter garage air is damp, and damp air creates galvanic corrosion between mismatched metals, surface rust on exposed steel and iron, and oxidation on bare aluminum engine cases. Physically covering all exposed metal surfaces before you walk away takes ten minutes and saves hours of detailing work in spring.
Spray exhaust pipes, frame welds, bare engine cases, and chrome components with a dedicated protectant. ACF-50 is the aviation-grade standard used by the military and aviation industry for exactly this purpose. A wiped-down coat of classic WD-40 is effective and widely available as an alternative.
Never spray brake rotors, brake pads, or tire sidewalls. Any petroleum product on friction surfaces creates a dangerous and potentially lethal loss of braking performance. After applying protectant to the rest of the bike, let it sit uncovered for 30 minutes to let the carrier solvent evaporate before fitting the storage cover.

Step 8 — Plug Exhaust and Air Intake
Mice, chipmunks, and other garage rodents view your motorcycle’s exhaust pipes and airbox as premium winter real estate. They will nest inside, chew expensive paper air filters, and pack mufflers full of nesting material that can ignite on startup.
Stuff clean, brightly colored shop rags or foam earplugs tightly into the exhaust outlets. Do the same for the main air intake snorkel. Critical: tape a highly visible reminder note directly over your ignition keyhole, or hang a tag from the handlebars. More than one rider has fired up their bike in spring with a shop rag still jammed in the exhaust header — it instantly becomes a flaming projectile and a direct garage fire hazard. The note is not optional.
Step 9 — Final Wash and Inspection
Wash the bike thoroughly before covering it. This is not cosmetic — it is preservation. Road salt, acidic bug residue, and tar grime will continue chemically reacting with clear coat and bare metal throughout storage. Removing them now stops the damage entirely.
Dry the bike completely using compressed air or a leaf blower to blast standing water out of engine fins, bolt heads, and fairing gaps. While drying, perform a final meticulous fluid inspection:
- Brake fluid: Check the level and color through the sight glass. Dark, coffee-colored fluid is heavily moisture-contaminated and needs immediate replacement before storage — not in spring. Contaminated fluid corrodes caliper pistons all winter. Our complete motorcycle brake bleeding guide covers the full fluid change process.
- Coolant: Check the level on liquid-cooled bikes and inspect for any milky discoloration that indicates head gasket contamination.
- Engine cases: Inspect for any fluid seeps or weeps. A small oil leak that is tolerable during the season will create a puddle and accelerate seal degradation over five months of storage.
Step 10 — Cover and Choose Your Storage Location
Your motorcycle cover must be a breathable fabric specifically designed for vehicle storage. Do not use cheap plastic hardware store tarps — plastic completely traps rising ground moisture, creating a greenhouse effect that will rust bolts, corrode electrical connectors, and accelerate paint deterioration in a matter of weeks.
Storage location priority hierarchy:
- Best: Heated, dry indoor garage with stable temperature.
- Good: Unheated, dry garage that consistently stays above freezing.
- Acceptable: Dry outdoor shed with good airflow and ventilation.
- Avoid: Outdoors exposed to snow and rain, damp unfinished basements, or anywhere near standing water or heavy humidity.
If outdoor storage is unavoidable, use a UV-resistant, waterproof outer cover paired with a breathable inner layer. Always add a heavy-duty disc lock — covered bikes are easier theft targets than visible ones.
Winterizing Checklist (Quick Reference)
Print this motorcycle storage checklist and tape it to your garage wall. Check off every box before you close up for winter.
| Step | Task | Notes |
|---|---|---|
| 1 | Add fuel stabilizer + run engine | Drain carb float bowls if carbureted. Do NOT drain FI bikes. |
| 2 | Change oil and filter NOW | Do not wait until spring — acidic used oil corrodes bearings all winter. |
| 3 | Battery — remove or connect smart tender | LiFePO4: never charge below 0°C / 32°F. Lead-acid: keep charged. |
| 4 | Fog the engine | Hand-rotate via rear wheel only. Never tap the starter on FI bikes. |
| 5 | Clean and lube chain | Heavy coat of O-ring-safe wax. Check tension and sprocket wear. |
| 6 | Inflate tires to high end of manual range | Never exceed sidewall maximum PSI. Get the bike off its wheels. |
| 7 | Apply corrosion protection | Skip brake rotors, pads, and tire sidewalls entirely. |
| 8 | Plug exhaust and airbox | Leave a highly visible reminder note on the ignition or handlebars. |
| 9 | Final wash and fluid inspection | Check brake fluid color, coolant level, and engine case seeps. |
| 10 | Breathable cover + correct storage location | Never use plastic tarps. Above-freezing storage strongly preferred. |
Frequently Asked Questions
Do I need to winterize a motorcycle if I ride year-round?
If you ride regularly through winter, full winterization is not necessary. However, treat your fuel if the bike will sit for more than 3–4 consecutive weeks, keep the battery on a smart tender, and rinse road salt off the chassis more frequently than you would in summer. Partial maintenance applied consistently beats full neglect every time.
How much fuel stabilizer do I add to my motorcycle tank?
For Sta-Bil 360, use exactly 1 oz per 1 gallon of fuel. For Seafoam, 1 oz per gallon is the minimum — up to 1.5 oz per gallon is safe without engine harm. Add the stabilizer before fueling so it mixes thoroughly during filling. Always run the engine 10–15 minutes after adding it to circulate the treated fuel through the entire system.
Can I leave my motorcycle battery on a trickle charger all winter?
Yes — provided it is a smart charger, not a cheap unregulated trickle charger. Smart chargers (Battery Tender, NOCO Genius, Oxford Oximiser) actively monitor charge state and pulse a maintenance charge without overcharging. Unregulated trickle chargers deliver constant current regardless of charge state and will boil a lead-acid battery dry over several months. For LiFePO4 batteries, ensure the garage temperature stays above 0°C / 32°F before leaving any charger connected.
Should I leave a full or empty gas tank over winter?
Full, always — on metal tanks. An empty or half-full metal tank allows condensation to form on bare internal walls, causing internal rust and water contamination that destroys the fuel system. Fill to the brim, add stabilizer, and run the engine. Plastic tanks (found on KTM, Husqvarna, and some BMW adventure models) do not rust, so a nearly-empty plastic tank is acceptable provided stabilizer is still added.
How long can a motorcycle sit without being started?
With proper winterization — stabilized fuel, fully charged battery, fresh oil — a motorcycle can sit 4–6 months without a problem. Without any preparation, modern ethanol-blend fuel starts degrading in 30 days and battery self-discharge becomes critical after 60–90 days. A correctly stored bike with mechanical components in good condition can theoretically sit for years — the fuel system and battery are the limiting factors, not the engine.
Is fogging oil necessary for fuel-injected motorcycles?
It is less critical than on older carbureted and air-cooled engines, but it remains worthwhile for any bike stored more than four months. The key difference: always distribute fogging oil by hand-rotating the rear wheel in gear — never by tapping the starter button on a fuel-injected bike, as this activates the injectors and washes the cylinder walls with raw fuel.
The whole winterization process takes about two to three hours, and the chemical supplies cost less than a single tank of premium fuel. Do it right once, and your spring startup will be a two-minute job instead of a half-day teardown. The two steps you absolutely cannot skip are fuel stabilizer and battery maintenance — everything else on this list protects your investment and resale value, but a varnished carburetor or a dead battery is what will physically strand you in April.
While you are in full maintenance mode, make sure your chain is correctly tensioned before spring riding — our motorcycle chain adjustment guide takes 15 minutes and saves the swingarm.
Suspecting charging system issues before storage? Our motorcycle stator guide explains how to diagnose a failing stator or regulator before winter so you are not stranded next season.